Friday 27 September 2019

Even more Sci Fi figures!

This is the last group of 28mm science fiction figures I am painting for a while. These are all from North Star and are sculpted by the excellent Mark Copplestone for the Rogue Stars rules from Osprey. I will, of course, be using them for my own sci fi skirmish rules. 

First, we have a figure I see very much as my gang leader together with his hirsute sidekick, obviously absolutely nothing whatsoever to do with a well-known film franchise set long time ago in a galaxy far, far away.................


Next up are two sinister assassin types plus a rather grand military chap of the old school. I wanted to keep the colour palette simple for the assassins and saw no reason to differ in any real way from how they are painted on the North Star website.


I really like the segmented arthropod figure perched on the shoulder of the military chap, as well as the dynamic pose of the female assassin.


Next up, we have a psyker and a large grumpy alien with a big gun. I really like his segmented armour made from the shell of some large alien bug. Perfect! 

Strong is the froggy psyker. Powerful his connection to The Schwartz is. Clearly, he simply had to be brandishing a light sabre.


Finally, here is a female trooper in armour and a combat droid. Again, I wanted a relatively clean look to both of these, but I wanted to avoid white armour, as frequently seen in a galaxy far, far away on the trooper. As for the droid, I wanted a simple metallic appearance, but also a sense that it is a droid that has been around a long time, maybe a relic from some kind of long-lost Old Republic or similar. So, I painted it mostly bronze over black. I think it has worked nicely.


These figures were a joy to paint. Nice clean castings with very little flash to trim away and lots of nice details. Recommended.

Monday 23 September 2019

Alien Squad Leader - a new AAR

OK, hands up, this ASQL game was a few weeks ago, but I decided against photographing yesterday's game at the club, because it was S&SF  with my Hyborian barbarians (again) and I thought it would be a bit samey. 

I would be defending the base in the distance with my GZG Corporate Mercenaries against Richard's multi-legged Alien Imperial army made up from GZG Xar, plus various other figures.

The Galactic Seafood Corporation had set up a luxury food processing plant on this remote planet, having discovered that the immature version of the locals (a.k.a. the Crabbies) tasted like a superior version of the best crab or lobster ever previously tasted. This exciting new product was being marketed across space as "The Sunday Roast Where Everyone Gets A Leg".

The locals were, understandably, outraged and had called in a punitive expedition from their relatives on the nearest Crabby Imperial homeworld.


Here are my opponents, looking suitable Crabby and Outraged.


There were some anti-grav vehicles too.


My Mercenaries were equipped with two new additions, combat mechs with laser katanas, not that I was planning to use them in close combat if I could avoid it. The yellow beads indicate that the units thus marked are on Overwatch.


My Force Commander was close to the objective, but not actually in that forward position, preferring to stay in the less advanced built-up area.


I deployed a variety of troops on Overwatch defending the Objective, included power-armoured Samurai. There was a question over these, as the rules state that they are equipped with Heavy Weapons, but a discussion with the author, Alex Self later revealed that this was in actual fact a typo, and they should properly be given Small Arms. However, having played a few moves before Alex turned up, we agreed to keep the HWs for this game only.


The Crabbies began to swarm forward, both from the central forest and also on their left flank. I was worried about those light armoured vehicles with their Superior Energy Heavy Weapons.


We exchanged fire, with both sides taking hits. The green bead markers show Pinned status. Corporate Mercenaries never Fall Back, neither do they suffer an activation penalty when Pinned.


The LAVs advanced. I knew that I'd have to try and take them out.


I got my own AFVs moving to counter the threat. These were equipped with longer-ranged Primary Weapons Systems. Unhappily, my commander soon took a hit.


In the centre my battered Ashigaru were holding their own, and were dishing out a lot of hits on the Crabbies. The GSC production lines were soon gearing up for a mass canning session of its new BBQ Crab speciality.


Things were looking OK, but I was worried about the amount of damage my small army was taking. The Corporate Mercenaries are an expensive force, and my break point was a measly eight stands.


My fears were soon exacerbated when the AFV containing my Force Commander (who had stupidly hopped aboard for protection) was on the receiving end of a double six from HW fire, causing two damaging hits and I failed my saving throw, so Bye Bye Big Boss.


Despite previously being stealth-shielded, my Ninjas were soon exposed to the unwelcome attention of the Crabby Light Vehicles and Beasts. No good could come from this.


Gradually, my defenders began to fall. The loss of my Inspirational Force Commander left me low on command options and I began to fail activation tests with annoying frequency.


The amount of fire I was receiving from the Crabbies was leaving my troops Pinned and vulnerable to hand-to-hand assault. There could only be one outcome.


The Aliens were damaged, but had greater numbers. The coup de grace couldn't be too far away .....


................ and it soon arrived with the demise of the Ninjas.


With eight stands lost and an enemy stand inside the Objective area, my battle was over. The Crabbies had their revenge upon the unscrupulous and exploitative Galactic Seafood Corporation's latest evil business venture.

Well, this was a hugely fun game. My mechs performed pretty well in their first outing and I couldn't really complain about getting Broken, seeing as the army is so small. In hindsight, the Ninjas weren't a good choice, but I love the figures so much I hate to leave them behind. To be honest, I'd love an all-Ninja army, but they would just get shot to bits the moment they revealed themselves, even if the rules allowed such a thing (which they don't!).

Thursday 19 September 2019

A solo CoC AAR

OK, it wasn't supposed to be a solo game of Chain of Command, but my opponent didn't turn up at the club last Sunday. Still, these things happen, so I decided to press ahead and play solo, and although the game lacked an element of surprise, it was still a relatively interesting exercise with some useful maxims reinforced (see my comments at the end of the report).


The scenario chosen was No. 3 Attack and Defend, with the British attacking. They rolled a 8 for support options, thus giving the German defenders 4pts of support.

The Germans would be defending this fuel dump behind these ruined buildings and along the road towards the German right flank. With the 4pts of support, I chose a tripod mounted MG42, an excellent defensive weapon which rolls 10D6 when firing.


The British would be attacking from the relatively open ground on the left, across the cornfields. Withe 8pts of support, I chose a carrier recce section, one with a 2" mortar and the other with a Bren team, plus an additional carrier with a Bren, both choices with junior leaders.


Looking from the British side towards the German position. The carriers would deploy from the road entering from the table edge.


With higher Force Morale (9 to 8), the Germans rolled first, but I chose not to deploy, waiting to see where the British would be coming from. The first British section deployed in the trees on the British right, opposite the bombed buildings. The British had the next phase, after rolling 2 sixes, and proceeded to then get two more phases in succession. I got things moving quickly, getting more troops on the table and advancing.


A second section deployed in the trees in the centre, going onto overwatch, with the recce carriers moving up along the road.


Finally, the Germans got to deploy, getting a section inside the factory ruins. A decent start, I think.


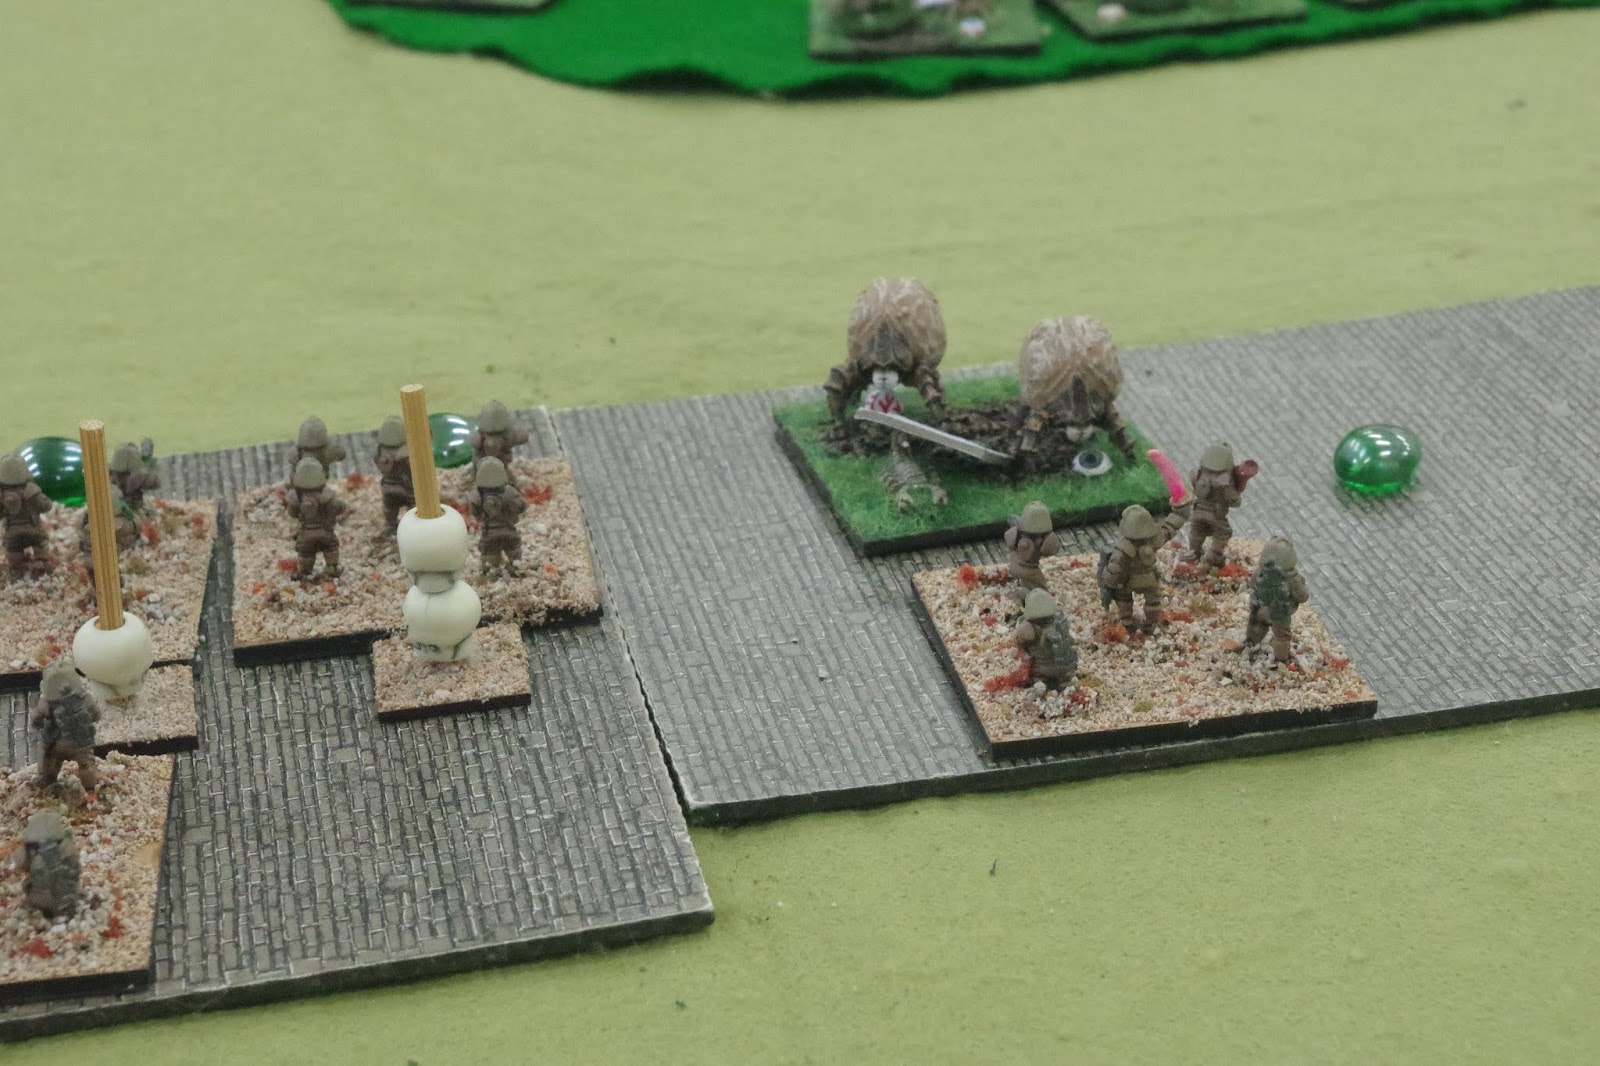
 These were joined by the tripod MG42 behind the hedges at the road junction.


The British began to lay down smoke so that their infantry could get up close to the hedge. The rest of the Germans advanced to form up a firing line behind the hedges, note the line of craters, which I decided were caused by RAF Tempests in an earlier phase of the battle firing on some now-departed Germans.


With the German Senior Leader on the table, he was able to keep on activating the tripod MG42 which managed to wound the right-hand section's junior leader, taking British morale down to 7.


In the centre, the Germans began to pour fire across the road into the British behind the hedges. Using the Maschinengewehr characteristic, the junior leader of the right-hand section directed the section MG42, causing casualties and shock, even though the smokescreen was blocking line of sight for the rifle section.


On the German left, the British Platoon Sergeant was using two of his three command initiatives to direct the Bren gunner to fire at the tripod MG42's position. The Bren scored two kills and a point of shock, but the British were wary of advancing into the face of more MG42 fire.


The Germans played one CoC dice to end the Turn, removing the smokescreen. The British were then able to see their wounded corporal to return to the fray. The German Panzerschreck team got off a shot towards the carriers but missed. The platoon lieutenant then ordered the 2" mortar team to start laying down more smoke.


The British were getting bogged down. Accurate MG42 fire was suppressing them pretty well and a series of poor command dice rolls was stopping the carriers from getting into the action. Perhaps the British would have been better off with a tank as support?


The British rifle section on the left was really taking a pasting and began to move across behind the smoke to avoid more losses from the MG42 across the road.


On the British right, things were going from bad to worse. Shock was mounting, casualties rising, include another wound to the section corporal (reducing his command initiative to one) and the section was soon Pinned.


With casualties mounting and little chance of a breakthrough, it seemed a good point to stop. British force morale was down to 6 and the Germans were content to sit back and use their MG42s to suppress the British. Time to call it a day.


Here is the final position. Both the right- and left-hand British sections are Pinned and much reduced in numbers and the central section is stuck behind a cornfield with its corporal reduced to one command initiative. The largely ineffective carriers are stuck doing nothing of use, having been scared by one single shot from the Panzerschreck.


So, what did I learn from this game?

Firstly, MG42s are key to success for the Germans. Site them well and use the section Obergefreiter to direct their fire whenever possible. This cannot be stated often enough; the MG42 is an excellent defensive weapon with excellent suppressive fire abilities.

Secondly, when attacking a German defensive position, don't try and win with your infantry alone. You'll need a lot of lucky dice to make it happen. The way to win is to use firepower, either with a tank or, even better with off-table mortars. If the British had had a FOO and off-table 3" mortars, the Germans would have had a lot of exploding stuff raining down on them, allowing the British to outflank them on the German right.

Thirdly, when defending Do Not Deploy Too Early. Wait and see what the enemy are doing first.

Wednesday 18 September 2019

More Sci Fi figures! Ghosts of Gaia

My science fiction project is moving on at Warp Factor 3 (at least!). The latest figures I've finished are from the terrific Ghosts of Gaia range by Bad Squiddo.

These are gorgeous sculpts (as are all Bad Squiddo figures) and lovely clean casts too. As they are so nice, I have chosen to photograph them front and back.

The figure on the right of this group is "Raging Annie", a miniature depiction of the Mother of Peegs herself - for those who don't know, Annie Norman just loves her Guinea Pigs a.k.a Peegs - and in the second picture, you can see her Baggy The Dice Bag backpack. I particularly like the armoured figure on the left with two chain blades. I love the dynamic pose.


After the exuberant colour schemes I chose for the first group, the second group are a bit more stealthy-looking and are clearly the kind of women who will pop up and take a few potshots from heavy cover. I really like the stealth cloak on the right-hand figure. I chose a few misty colours, inspired by the odd camouflage patterns on World War One German fighter aircraft.


It is back to colour for the remaining four figures. These figures have a fantastic comic book quality about them, and that made me paint them so that they will stand out on the table. I thought that red would be a good choice for these two. 


and purple/violet shades for these two.


So, there we have it. Some more figures ready for play-testing my Sci Fi skirmish rules.