Wednesday 31 January 2018

Alien Squad leader - the first outing for the 2nd Global War Soviets

Last Sunday was the club AGM, but there was some time for games afterwards, so Alex and I played a 150pt game of ASQL, as we had discussed a week before. I was keen to get my Soviets on the table and Alex wanted to see how they would perform.

Here is my force;


From left to right, starting at the back, there are;

2 stands of suit wearers (power-armoured infantry)
2 unarmoured light transports with rocket artillery
3 heavy tanks with superior weapons (allows a re-roll)
4 stands of crewed weapons (heavy weapons)
1 political commissar
4 stands of veteran regular infantry (2 upgraded to command stands)

I chose this force before we chose the mission, which turned out to be Scenario 2 - Meeting Engagement, which meant that the defender has been out-scouted and the attacker may deploy certain troop types on the table. Everything else is off-table and must enter the game from a previously-placed deployment point. I was the defender.

Alex's army was a Rebel Alliancce one, with Birdmen flying infantry, Human troops and a few characters, including two warrior monks with inspirational leadership and considerable fighting skills, plus a medic.

The table looked like this. I would start on the left-hand side.


Immediately, a limiting factor emerged. Crewed weapons can only move 10cm per turn. This made their deployment a painfully slow business and they never managed to do anything at all useful during the game. Clearly, their role is much more suited to a game where they don't have to travel any distances to get stuck in.


My armour and mobile rocket artillery would be my main threat, and soon one of my tanks forced Alex to withdraw his only vehicle with a long-range weapon. I advanced my power-armoured troops and a commander into the woods, where the commander would be able to call down indirect artillery fire onto Alex's Human troops. This proved to be immediately successful and he began to sustain a lot of hits. Unhappily, I was unable to keep this artillery fire going due to poor command rolls and his medic was quickly in action healing the hits. Then, his annoying flying infantry appeared, causing me to withdraw a command stand that had sustained a hit. My power-armoured troops proved to be pretty hopeless and after a few rounds of combat, including against the Jedis warrior monks, they were utterly wiped out. I really cannot remember ever having much success with the 5+ saving roll for power-armoured troops.


Elsewhere, my tanks rumbled forwards, shrugging off fire from Alex's Human defenders and making sure that his guys kept their heads down.


Here is the unhappy demise of the power-armoured troops, plus the commissar and the regular veterans.


 However, elsewhere my main forces slowly moved into strong defensive positions where I am sure they would be hard to assault.


Unhappily, we ran out of time before we could reach a result. Totalling up the score, Alex had caused more damage than I had managed, but the result was a draw, albeit one that went against me. Overall, the rwal deciding factor in this battle was Alex's group of characters, who pretty much won the battle in the woods and mitigated against my early artillery success.

So, what conclusions can I draw from this battle? Well, here are a few thoughts;


  • Power-armoured troops are not really that good
  • Crewed weapons move too slowly in a mobile environment
  • Tanks rule the battlefield against lightly-equipped forces
  • I should have taken more tanks instead of the power-armoured guys
  • Indirect fire artillery can be devastating
  • I hate flying infantry

Friday 26 January 2018

Freyja's Wrath Kickstarter - a short update


For people who are interested in this, you can check the actual Kickstarter here. So far, three stretch goals have been unlocked and there are some nice updates on what the actual minis look like once painted. The next stretch goal is going to be "Freyja on Boar and Foot", which sounds pretty good to me!

There are 11 days left to get pledged.

I have to say that I am very excited about this, the minis are terrific and are going to look great on the table.

Monday 22 January 2018

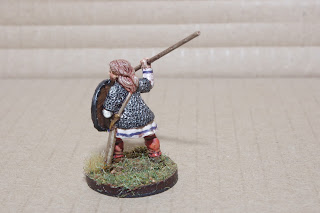
Freyja's Wrath - my sample figure is painted

I really wanted to paint up the sample Kickstarter Shieldmaiden that Annie sent me on Saturday, so this morning I primed her with Tamiya light grey spray primer and once the primer was dry I set to work.


First, I just blocked out the various areas in base colours, with the chainmail hauberk in black. After sticking the figure on a 2.5cm round base I set to work with the detailed colours, highlights and dry-brushing, before finishing the figure off with a wash of Windsor and Newton Peat Brown drawing ink.

I painted the shield separately and superglued it on before the ink wash stage. Once the ink was dry, I flocked the base and added a couple of small clumps. Finally, I varnished the figure in matte spray varnish and gave the finished article a good spray of Testor's Dullcote. Unhappily, this never seems to completely remove the shine in close-up flash photos, but I can promise you that in the flesh, she has a proper matte finish.

Anyway, here she is;


OK, not as professional a job as Ralph Plowman or Paul Sanderson could achieve, but I am pretty pleased with the results. Now, all I need to do is logon to the Kickstarter once it is open at 18:00 tomorrow (23rd January).

Sunday 21 January 2018

Freyja's Wrath - A Bad Squiddo Kickstarter

OK, now this is really exciting stuff. Annie Norman of Bad Squiddo Games is launching a new Kickstarter on 23rd January. 

I am sure that many people already know Annie's company and the kind of figures she sells, but for those who don't, here is Annie's own description of Bad Squiddo;

"Hello! Welcome to Bad Squiddo Games, home of Believable Female Miniatures, Baggy the Bag and Annie - The Dice Bag Lady. Bad Squiddo Games provides gamers and painters around the world with the largest selection of female miniatures out there. As well as manufacturing my own line, I carefully hand pick stock from over 50 different manufacturers. This means you have as wide a choice as possible to get that perfect miniature, and it’s a great way to bring many companies to work together in what is a small and friendly industry.
Just like a large portion of the industry, Bad Squiddo Games is a one-person business set up, owned and run by me – Annie Norman. However, I do work with some absolutely outstanding sculptors, casters, painters and concept artists – both in talent and personality – which make up the “Bad Squiddo Family”.

Phil Hynes, John Morris, Alan Marsh, Shane Hoyle, Jo Brumby, Tim Prow, Martin Baker, Delaney King, Kev White, Mark Evans and Andrew May are the putty pushers behind the madness so far, with Paul Cubbin and Andrew Taylor (and John Morris again!) bringing them to life with stunning paint jobs. They all deserve a mention and clap here as the company would not be what it is without them.

The number one aim for Bad Squiddo Games is to create and supply the miniatures that would have made the hobby far far better for my 10 year old self. To welcome more young girls and women into wargaming and miniature painting, as well as providing diverse options to the entire gaming community. And yeah – cool toys!"

So, on to the Kickstarter news. I had a hint of what was coming when I chatted with Annie at Reveille II last November, at the time it was all hush-hush, but now, all can be revealed. The Kickstarter is a comprehensive range of Norse-themed 28mm figures, entitled Freyja's Wrath; Swordmaidens of all kinds, archers and slingers, beasts, goddesses, the range is going to be huge.


Bad Squiddo already has a range of Swordmaidens, and very nice they are too, so it is great news that these new figures will be completely compatible with the existing ones.


I am lucky enough to have been sent a preview figure, and she is fantastic.


My first impression was "Wow!" The casting is incredibly clean, absolutely no flash at all and the detailing is crisp and unfussy. One thing that I love is that her spear is a steel wire one rather than a moulded piece (which are fine but do tend to get bent). I am really looking forward to painting her up (which I hope to do ASAP in the week) and getting some pics posted, but for now, here she is with her shield attached with a blob of Blu-Tac.


Yes, she is a Viking warrior, but I can see lots of other possibilities for these figures. After all, when it comes to Late Antiquity and the Early Mediaeval, there are plenty of similarities in the dress and equipment of most of Western, North and Central Europe. These could also feature in all manner of fantasy armies, from Middle Earth to Frostgrave.

For me, the first things that spring to mind are Dux Brittaniarum and Saga (and there is a new version of Saga being released by Studio Tomahawk very soon), but I am sure that everyone has their own favourite set of rules. They would easily work in a Sword and Spear (or S&S Fantasy) setting too.

So, if you want to get on board, the Kickstarter will be active at 18:00 (UK time) on 23rd January.

Monday 15 January 2018

Lincombe Barn 2018 HOTT tournament

Yesterday was the long-awaited 2018 HOTT tournament at the club. There was a total of 12 contestants, four from the club and eight players who had travelled from elsewhere to take part. 

There was a wide variety of 24pt armies on display, with a huge variation in styles and inspiration, making each game a joy to play or watch. I brought along my Hyborian Barbarians, comprised of a Rider general, four Warbands, three Blades, two Shooters and a Hero. We all played five games, so we all faced plenty of challenges to overcome, some of us more successfully than others. 

Also, there were some club players who weren't taking part in the tournament. Some were playing Clive's excellent Airspeed post-apocalyptic pod racing game, just take a look at the terrain items Clive has scratch-built. I particularly like the trailer home with a garden. Even in a blasted wasteland there is a budding Alan Titchmarsh, dreaming, no doubt of the Chelsea Flower Show.


Elsewhere there was an Arkham Horror boardgame in progress.


Now, here is a selection of pictures of the main event, the HOTT tournament. First, Dwarves vs Meerkats (none of whom seemed to wear a smoking jacket or have a dodgy Russian accent).


I particularly liked this giant jellyfish (I think it was a Flyer) in the Fishman army. (edit: actually, as has been pointed out by Martin below, the jellyfish was a Dragon).


Here are my Hyborians in action. Firstly, against a nice-looking army of Abyssinians;


Here facing off against a Life of Brian-themed army led, inevitably, by Biggus Dickus as a Blade general and featuring Brian's Mum as a Paladin and Brian as a Hero, rather than a Very Naughty Boy.


My Hyborians also had a game against an army of Teutonic Knights, with two Behemoths portrayed by wedges of knights.


Here are the Fishmen against one of two King Arthur armies.


These are Ninja Camels, with a Unicorn Paladin.


And next, here is probably the most innovative army, made up from a load of flying Puffins with a Scary Rock stronghold, although the Rock looks more surprised than actually scary.


And here is Nick, who organised everything, taking some time out to photograph the various games.


Thanks Nick! Also, thanks are due to Andy, who organised the catering and kept everyone fed and watered.

So, what happened in the end? Well, the plaudits go to Pete, the defending champion with his Life of Brian army who won again this year. Here are the final standings;

1. Pete              W5  L0  15pts
2. Armand        W4  L1  12pts
3. Colin             W3  L2    9pts (killed 2 generals)
4. Mark             W3  L2    9pts (killed 1 general)
5. John              W3  L2    9pts
6. Martin          W2  L3    6pts (took 1 stronghold)
7. Owen            W2  L3    6pts (took 1 stronghold, but worse kill/lost difference)
8. Kevin            W2  L3    6pts (killed 2 generals)
9. Keith             W2  L3    6pts (killed 2 generals worse kill/lost difference)
=10. Tony         W2  L3    6pts
        Carole       W2  L3    6pts
12. Nick            W0  L5

As you can see, it was pretty tightly-fought, with many of the placings being decided by killing generals and taking strongholds. 

It was a terrific day of gaming, lots of fun and a nice and friendly bunch of opponents. I look forward to the 2019 tournament. I expect that I'll spend the intervening 12 months trying to build a killer army.

Thursday 11 January 2018

A new army for Alien Squad Leader - Second Global War Soviet Confederacy

In ASQL V3.0 there are several new army lists. One set of armies that I liked the look of from reading the playtesting version of the rules was a group covering the "Second Global War"

The rule book has this to say about the Second Global War;

"The 2nd Global War occurred within an alternate timeline in the Earth's history, in which each side developed strange new weapons within their laboratories and workshops of war, some of which worked sufficiently well to put into production."

The rules go on to list five separate armies, three for the Allies (The United Kingdom of Albion, the Soviet Confederacy and the American Union) with a bias towards new technologies, and two for the Axis (German Occultists and Far Eastern Empire) with the emphasis on arcane knowledge and the supernatural serving the cause of creating genetically-enhanced super warriors. This is clearly a "Weird WW2" type of thing, which I reckon has a fair few fans and should prove popular.

The list that particularly appealed to me was the one for the Soviet Confederacy army. I just needed to decide how I was going to put this army together.

Of course, I could just have bought a load of WW2 Russian infantry, tanks, vehicles and artillery, but where's the fun in that? In any case, I already had an army painted up that could easily be used for this, once I'd rebased it onto 5cm square bases. All it really needed was some suitable vehicles.

The army I wanted to reuse was one of the first 15mm sci fi armies I ever bought, using Ground Zero Games Neu Swabian League miniatures. I really like these figures, they have a certain "look" that just appeals to me. Not too futuristic, but suitably different enough to work in a parallel Earth setting.

The other thing that I like about this army list is the number of tanks that can be used, together with the optional use of indirect fire rocket artillery.

So, I set about rebasing my infantry and collecting and painting some tanks and other vehicles. Finally, I've finished the job off and here are the results. First, an army general (the three figure base) and two political commissars;


Four bases of Green Recruits (inferior infantry), with three figures per base.


Four bases of "anti-tank guns", a.k.a Heavy Weapons;


Four bases of mortars, representing "field artillery", a.k.a more Heavy Weapons;


Two sniper bases (front) one heavy, one standard, one base of Mechanical Scientists (rear left) and a command base (rear right);


Four bases of power-armoured Battlesuit Wearers (I love these figures);


The next two pictures both show three bases of Veteran infantry and one Command stand;


Note that in all the above pictures there are a mix of weapons on each stand. This is just for aesthetic reasons,  they all count as having small arms (apart from the Heavy Weapons stands and one of the two snipers). The Mechanical Scientists are a specific unit that can repair broken-down Unreliable vehicles, unhappily a feature of these army 2nd Global War lists which reflects the experimental weaponry.

Now, here is the armoured fist of this army. First, we have three tanks (which can be upgraded to heavy tanks at the cost of +1 point). These are from Brigade Models;


Next two armoured transports with rocket launchers, from TheSceneUK. To save points, these could be downgraded to unarmoured trucks;


Next, also from TheSceneUK, two experimental super-heavy tanks;


And finally, from GZG, four stands of Light Vehicles in the shape of NSL hover-cycles.


So, I have now created a different kind of Human army, one with some plus points, e.g. stubborn infantry and commissars who can motivate the troops to advance and ignore Fallback dice rolls but also some negative ones. i.e. unreliable experimental technology and slow and unreliable vehicles and tanks.

I am looking forward to getting these onto the table at some point. I've clearly, as usual, got too many troops for a basic 150pt army, and even a 200pt one, but at least I have a lot of options here.

I am also wondering if, with a few suitable additions, I can deploy my Corporate Mercenary army as a Far Eastern Empire force. It looks like a distinct possibility.

Monday 8 January 2018

A new Hyborian stronghold for HOTT

When I first created my Hyborian Barbarian army for HOTT, I scratch-built a stronghold that was the maximum 600 paces square. Now, I really like the finished article, but it has to be admitted that it takes up a lot of room on a 15mm HOTT battlefield. So, I've built a new, smaller one that will hopefully be easier to defend.


You will see that I've kept the detachable Cthulhu statue, because I think that it is a terrific model, and I've used a similar construction method, i.e. blue insulating foam, cut to shape, undercoated, with ballast glued on, painted and then drybrushed and flocked. The two rocky outcrops that act as a primitive gate are two pieces of resin rock scenery that I bought at Colours last Autumn from, I think The Square.This smaller stronghold is roughly 300 x 450 paces. 

It has a secondary purpose too, because I am going to use my Hyborian Barbarians as the basis for a 15mm Sword and Spear Fantasy army, and this will be the army's Baggage Camp. Of course, I will need to buy more figures to give me a suitably-sized army, but when did a wargamer ever have enough toys? At least it will give me a reason to buy some of the wonderful Copplestone Yetis and Wolves (to be Large Beasts and Beasts), as well as more warriors to bulk out my rank and file units.

Post Christmas big IABSM AAR

The club normally meets on Sunday afternoons, but over the Festive Season, we didn't meet up on either Christmas Eve or New Year's Eve. However, we did have a Thursday afternoon session on the 28th. I offered to put on and umpire a big game of I Ain't Been Shot Mum for two players a side. This would be a 1944 game, with the British forces pushing forwards into the Low Countries after the Liberation of France as part of the advance towards the Rhine.

What I wanted to do was put on a game with a lot of tanks but also have plenty of obstacles to aid the weaker side (in this case weak was relative). The field was laid out on four tables, creating a long battlefield with plenty of cover and dead ground. Here it is, seen from behind the German position.


The scenario was as follows;
After the end of the Battle of Normandy, Allied forces are pushing eastwards into the Low Countries. German resistance is stronger than expected but patchy in places. Defence in many cases depends on ad hoc formations made up from whatever troops are available to counter the advance of the Allied armour.

This scenario is one such encounter.

A British tank squadron and a company of motorised infantry have been tasked with taking a river crossing.

An ad hoc German Kampfgruppe is opposing the British advance.

 
The German force was:

1 weakened Kompanie of Panzergrenadiers (veterans)
Co HQ (with 3 Panzerschrecks) L3 BM (2 x SdKfz 251)
2 x Zugs each with L2 BM
1 section of 4 x MG42
1 improvised Rifle Kompanie (poor regulars)
HQ – 2 x tripod MG42, 2 x Panzerschrecks L2 BM L1 BM
1 rifle Zug L1 BM
1 Zug of Panzerknackers (2 x MG42 teams, 4 riflemen, 8 x Panzerfaust shooters) L2 BM

1 ad hoc Panzer Kompanie
HQ – 1 x Tiger I L3 BM (veteran crew)
1 x Panzer IVH (average crew)
Zug 1 – 3 x Panther G L2 BM (average crews)
Zug 2 – 4 x Panzer IVH L2 BM (green crews)

Anti-tank Zug
3 x Stug III (average crews)

The British force was:

1 squadron of Cromwell IV and Sherman Vc tanks (all average crews)
HQ – 3 Cromwells (1 with 95mm CS howitzer) and 1 Sherman Vc L3 BM
4 troops, each with 3 Cromwells and 1 Sherman Vc each with L2 BM

1 company of motorised infantry (the infantry are dismounted from their vehicles) all good regulars

Co HQ – 1 x 8 man rifle section L3 BM L1 BM (in a halftrack)
3 x rifle platoons each with L2 BM
1 carrier section – 4 x carriers with Vickers MMGs (can be mounted or dismounted)
1 flamethrower section (4 teams in a halftrack)

For this scenario, the following conditions were applied;
The Germans may defend in depth on both sides of the road. The Germans must defend a river crossing at their end of the table.

Some of their tanks have been recycled from battle-damaged vehicles and the German deck includes the Vehicle Breakdown chip. When this is drawn, roll 1D6 for each tank that has already been deployed (don’t roll for tanks under Blinds). Only roll once for each tank.

Any tank that rolls a 1 is broken down and will be immobilised for the rest of the game, but can continue to fire. Any shock against an immobilised vehicle will be doubled.

Any tank that rolls a 2 will suffer a failure of the turret traverse and will only be able to fire in a 90 degree forward arc.

The Panzerknacker Zug is split into two sections, each with 1 x MG42, 2 riflemen and 4 men with Panzerfausts. Once the Fausts have been fired, these troops revert to being ordinary riflemen.

The Germans have four pieces of field earthworks and one small pillbox.

The Germans can deploy hidden or under blinds, They have no dummy blinds.

The British will deploy under blinds and have two dummy blinds.

The 95mm CS howitzer fires smoke shells only, as do the 2” mortars in the British platoons.

The British are to advance along the road, which is hemmed in by trees on both sides to take the two bridges over a river defended by a German force. Only the larger bridge can support the weight of tanks, but smaller vehicles can cross both bridges. The terrain is undulating and visibility is broken up by the trees and hedges. The ground suits the defenders and is not prime tank country.

Intelligence reports that the bridges are well-defended.

I allowed the Germans to deploy up to halfway  along the length of the table, with the British being limited to a deployment zone that was one quarter of the table deep.


The Germans chose to deploy with everything hidden in their deployment zone. I didn't know where they had placed their units, but I assumed that the pillbox would play a role. The British deployed under blinds on both sides of the road but pretty soon they had had a number of elements spotted.


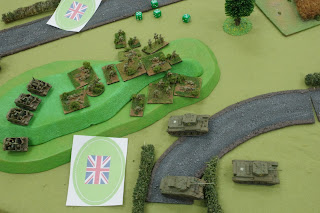
The 2" mortar of this platoon quickly started to lay down smoke to prevent the defenders from firing on them. On the British right, more tanks and infantry advanced towards a hill, spotting some German defenders, Panzerknackers and MG42 teams from the weak Landser Kompanie. These were quickly eliminated by mass machine gun fire from the tanks (well, the Cromwells actually, the Sherman Vc tanks not having hull MGs) and the Vickers-armed Carriers. The power of the machine guns was pretty much devastating.


The Germans were unwilling to show their hand at all and most of their troops remained unspotted and hidden, holding their fire and pretty much inviting the British to advance. The British managed to discover a Zug of Stug III tank destroyers behind a hedge.


Despite massed fire from the two British left flank tank troops, these Stug IIIs remained unharmed and soon caused havoc on the single Cromwell troop in front of them. The infantry platoon was also suffering from accurate fire from a tripod-mounted MG42 in an earthwork. The British advance appeared to be stalled on the right.


On the British left, the tanks were pretty much stuck in a traffic down in the unsuitable ground on this side of the road.


The platoon supporting these tanks, cleared away the German infantry screen  opposing them and started spotting more Germans. These were a tougher prospect than the Landsers - hull-down PZKfw IVs and the Tiger.


On the German left, the remaining tanks were revealed (a poor photo, unfortunately);


And the Germans also revealed a previously unseen Zug of Panzergrenadiers covering the central lake and road junction.


A different view of the German Panzerfront, a daunting sight for the British tanks.


At this point, the  clock was ticking and there was little time left to reach a conclusion. However, it didn't look too healthy from the point of view of a British tanker. Regretfully perhaps, the British commanders decided that discretion was the better part of valour. One tank troop was a set of burning wrecks and one infantry platoon had taken a lot of casualties from machine gun fire. The Germans remained in a solid defensive posture, with the only casualties being from the screen of Panzerknackers and MG42 teams.
   
So, an interesting game, the Germans playing a canny waiting game and the British being unwilling to advance too far into the unknown, even declining to use the Allied Armour Bonus chip whenever it emerged from the bag. Discussing this afterwards, the consensus was that after the attritional horrors of the Normandy campaign, the British regulars tended towards self-preservation rather than Tally Ho-style heroics. We agreed that once the location of the German tanks was known, the appeal of advancing towards those long 75mm guns (not forgetting the 88mm on the Tiger) was limited, to put it mildly, especially as they were adequately protected by those unharmed and fresh veteran Panzergrenadiers.