Showing posts with label wargaming. Show all posts

Sunday, 5 January 2025

From 2024 into 2025

Well, this should have been a review of my achievements in 2024 and a list of my plans for 2025. However, as regular readers will know, I suffered as huge flare-up of arthritis in both hands last year, which pretty much threw all of my plans way off course. When I was able to paint again, I concentrated on some quick wins by painting stuff that I wanted to paint and not things that were long-term projects. So, really, my 2025 plans are pretty much based around a few of the things I was supposed to do in 2024 plus a couple of new ideas. I'm not going to bother listing anything. Just getting various stuff done will be a win as far as I'm concerned.

https://toofatlardies.co.uk/wp-content/uploads/2024/10/midgard-heroic-battles.png

I will be trying to focus on Midgard, though. This is because I already have two or three armies that might easily be repurposed for Midgard without much effort. These are Principate Roman auxiliaries, a force that is almost complete but just needs some archers, a Dominate period Roman army that really just needs a couple of mounted leaders and maybe some skirmishing light cavalry and, thirdly, a fantasy Norse army based around my Bad Squiddo shieldmaidens and some jötnar and other mythical beings. 

I do have a fourth fantasy Midgard project, which will be a Warhammer Old World Empire army with human foot and horse and some ogres, all based around the Wargames Atlantic conquistador sets of foot and mounted troops plus the Landsknecht ogres. I think I'll need to find a suitable Battle Wizard from somewhere, too. 

I do have one small urgent addition to my 18th century Syldavian and Bordurian imagi-nations, too. I won't say what it is, because it will be required for Winter Wonderlard V at the beginning of February.

So, that is pretty much all I have to say about future plans. 

Monday, 23 January 2023

My first completed work of 2023 - WW2 British Airborne in 15mm

I,ve spent all of January so far staring at these figures and finally painting them! There are a lot, so scrolling down is required.

First, some anti-tank support options for my existing Airborne platoon, a 6-pdr A/T gun with a jeep and an officer followed by four two-man PIAT teams;


Next a couple of Vickers MMGs;


Finally, a few extra officers, one pair can also be used as a FOO for off-table mortar support and a couple of Rifle sections;


All of these figures come from Peter Pig, as do the original platoon. They will be used for a game of Big Chain of Command (two players a side) I will be running at Winter Wonder Lard at BIG in Bristol in late February.

I am sure that they will also come in handy for possible Arnhem games in the future.

Sunday, 30 May 2021

Bad Squiddo Women of WW2 - ATA pilots

Two posts in one day! These are two more Bad Squiddo Women of WW2 figures, two Air Transport Auxiliary pilots.


The sharp-eyed among you will notice that I haven't painted the pilot on the right in correct ATA uniform colours, but there is a reason for that which I will explain below.

Here they are from behind.


The reason that I didn't use the right colours is that I want to use her for a range of different scenarios and games, maybe as a pilot in Pulp games or something else. Therefore, I didn't want to limit her to being just an ATA pilot. Also, I have some Wren signallers to paint and also some dispatch riders so I didn't want to have too many figures in dark blue.

Anyway, I think that they have come out pretty nicely. They are lovely sculpts and crisp casts, as we have all come to expect from Bad Squiddo minis.

Monday, 20 May 2019

Blow the Bridge - another game using this scenario for CoC

I wrote a scenario for Coc last year called Blow the Bridge. I wasn't completely happy with the scenario as written, so I tweaked it a bit to try and rebalance the odds.

Here is the scenario;
It is 1944, the Allies have broken out of France and are advancing towards Germany. The British are advancing across the relatively flat and open countryside of the Netherlands. A reconnaissance group  has been sent in front of a tank squadron to probe the German defences along a canal which is an obstacle to any further advance. Their objective is to capture a bridge over the canal, which will allow armoured units to cross and outflank the main German defensive line.

The British force consists of;

1 rifle platoon (HQ plus three sections)
1 recce section (3 Universal carriers, 1 with a PIAT team and a junior leader and 2 with Bren teams)
1 Cromwell Mk IV tank with a 75mm gun (this will only deploy on the 4th British phase, representing the advance guard of an armoured squadron)

The defending German force is;

1 standard rifle Zug (HQ plus three sections)
1 tripod-mounted MG42

1 4-man engineer section, carried in a half-track without weapons. Their role is to plant charges, not fight. If fired upon, they count as being in light cover. They will initially deploy from the table edge as a team without a leader and once deployed can only be activated by the German senior leader or on a command dice rolling a 1.

The Germans also have two lengths of barbed wire and two small prepared defensive earthworks. These will be placed after the Patrol Phase.

 The Germans can also call on support from a single SdKfz 250/9 with a 2cm auto cannon and a co-axial MG34 in an open turret. This can only be deployed by using a CoC dice and will enter from the German table edge.

The British objective is to attack the bridge and secure it before the Germans can destroy it.

To win the scenario, the British must have neutralised the engineers, driven back the defenders and have at least one section on the bridge itself.

In the patrol phase the Germans will use three patrol markers and the British will use four (because they are attacking). The British will also have two free patrol moves before the patrol phase properly commences.

The game will be play across the width of the table. The canal will be down the centre of the table, with the bridge placed in the central third of the table. The canal can only be crossed by using the bridge.

The British will start the patrol phase from either the left corner or the right. (roll 1d6 1-3 left, 4-6 right)


The Germans side of the table will be in three sections left, centre and right To see where the Germans will start the patrol phase roll 1d6 (1-2 left, 3-4 centre, 5-6 right)

So, this time the British force is somewhat stronger, having some armour appearing during the game. The Germans have also been slightly strengthened by the addition of the SdKfz 250/9.

In this game, Brian was the defending German leader, while I was commanding the British.

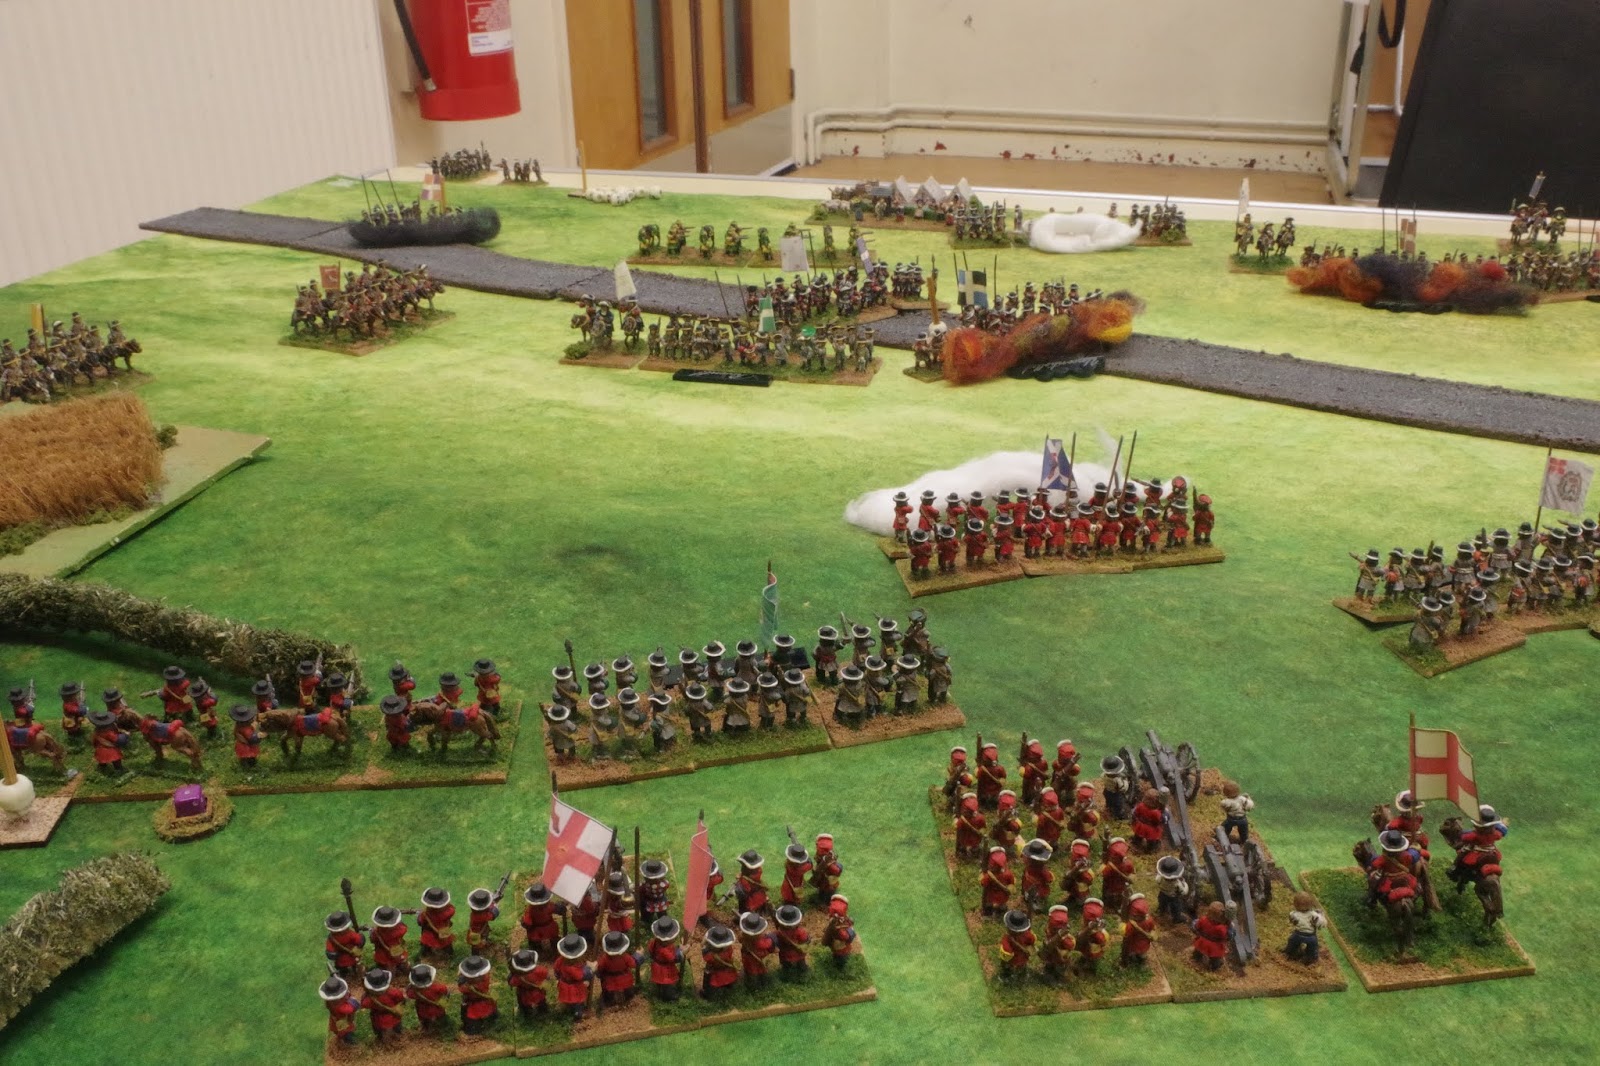
The table was laid out like this. Clearly the RAF has been doing some bombing and there are craters and gutted buildings near the canal. You can see how the Patrol Phase ended in these pictures.


Our Force Morale rolls favoured the Germans, who had a FM of 11, with the British being somewhat less motivated at FM 8. The Germans wasted no time in deploying a section right on the edge of the canal, protected by an earthwork.


Access to the bridge was made difficult by two sections of barbed wire. The engineers began to drive towards the bridge, protected by a tripod-mounted MG42 behind an earthwork in front of the walled farm.


The recce carrier section was the first British unit to appear. The idea was to dash forwards to seize the bridge.


I also deployed a rifle section in the ruins close to the bridge, placing them on Overwatch. I had a JOP placed just behind the ruins, which I hoped would let me get troops forward quickly.


I got another section on the table, moving them tactically in support of the carriers towards the bridge.


The Germans by the canal began to open fire on the section I had stationed in the ruined buildings, causing both shock and casualties. Over time, this would be a real problem for me.


The second section closed on the bridge, but was unable to cross because of the wire. The carrier teams dismounted, leaving the drivers in the vehicles. The rifle section on Overwatch fired at the engineer half-track, causing enough shock to make it withdraw.  Unhappily, this drew a lot of fire from the Germans in response, inflicting both shock and casualties.


The Germans were also deploying across the canal, with a section in the trees near the walled farm. My rifle section in the ruins was having big problems from accurate fire from two directions, with the MG42s causing many casualties, finally causing the few survivors to flee. This caused my FM to drop to 6. Luckily, by this point, a tank from the lead troop of the advancing squadron made an appearance. I hoped that this would turn the fight to my advantage. So far, the engineers hadn't managed to start working. I had also deployed my remaining rifle section, close to where the other one had fled, but out of sight of the Germans. The appearance of the tank led to the withdrawal of the German engineer section. 


To the right of the bridge, the tripod MG42 was hitting the recce section, with extra fire coming from a German section in the trees closer to the bridge. Luckily, my Senior Leader had also arrived with the platoon 2" mortar. Smoke time!


The smoke enabled the recce sections to get back on board their carriers and they drove forward over the wire obstacles (shown here by them being removed from the road). The Cromwell was also firing HE at the Germans, with a liberal dose of co-axial MG fire too. This was beginning to weaken the defenders, but I was worried about Panzerfausts and the even more nasty Panzerschreck. The armour of the carriers proved to be an impermeable barrier to the MG42, which was firing at the recce section now holding the bridge.


The SdKfz 250/9 now appeared. This was more of a problem, as its 2cm autocannon was capable of defeating the weak carrier armour. Luckily the Cromwell's commander was able to direct fire at the half-track and drive it off with shock and a wounded commander.


Another cross-canal firefight developed and my rifle section took up station in the ruined buildings. Combined with HE and MG fire from the Cromwell, this section was much more successful and the Germans were suffering losses now, with shock building up too.


Things were now looking pretty impossible for the defenders. The British had the recce carriers on the bridge, with a rifle section just behind and a Cromwell tank ready to blast anything that might appear from the walled farm, especially the half-track full of engineers, so the Germans pulled back, leaving the British in control of the bridge.

Well, this time the scenario delivered a British win, mainly because of the armour.

I am still not fully happy with the scenario. The tweaks I've made seem to have shifted the balance towards the attackers, but possibly too much so. I have thought about this again, and perhaps the answer might be to give the Germans a second tripod MG42 or maybe a second Panzerschreck? 

Alternately, perhaps the answer might be to leave the forces the same but play the game along the length of the table, with the canal closer to the German end, leaving the British with more ground to cover? In that scenario, the Germans could deploy in depth, forcing the British to fight along a longer approach to the bridge, with more opportunities to delay them until the engineers could place charges and blow the bridge. Currently, I like this idea better.

Tuesday, 15 January 2019

My Nine Years' War Sharp Practice mods get a further revision

It's been a while since I've had a chance to use my nice Lurkio late-17th century French and Anglo-Dutch armies, which were the inspiration for my Sharp Practice mods, which were published in the TooFatLardies 2017 Summer Special.

Since first seeing these mods in print, they have undergone a revision and some resulting changes. This was a chance to playtest those revisions again and see how things could be tightened up and clarified.

I must say, in passing that I am really pleased to see that Lurkio is continuing to operate under the aegis of Simon Hall's The Wargames Zone. It did look at one point like the company would cease to exist, but happily these terrific 15mm figures are still going to be produced.

In this game at the club last Sunday, I took command of the Anglo-Dutch army while Brian commanded the French.

The battle was an encounter between the two armies on the outskirts of the (fictional) Dutch town of Grolschbeek. The Anglo-Dutch were first on the field, with a cavalry brigade moving sharlpy towards the Grolschbeek junction. The aim was to secure the right flank before the French could deploy.


Elsewhere, a regiment of Dragoons took up a position in the gardens of a manor house on the Anglo-Dutch left flank. The !st Regiment of Foot (the Royal Scots) advanced, flanked by two Danish regiments of Foot. The Nassau Horse protected their right flank as they formed a defensive line.


The French began to advance across the main road into Grolschbeek, with the Rohan and Villeroy Horse supporting the Languedoc and Champagne regiments of Foot.


The Dragoons waited, relatively secure behind some hedges with a cornfield forming something of an obstacle to the French.


The English Horse began to deploy on the outskirts of Grolschbeek, behind the advance of the Nassau Horse.


Things began to get crowded as regiments in column and the artillery began to emerge from the Anglo-Dutch camp. The Anglo-Dutch Captain General Lord Lymeswold was finding it hard to get his Elite troops into position before the French advanced.


And here come the legions of Le Roi Soleil, under the command of Maréchal de France, le Duc de Cabecou.


The Dragoons began to fire on the advancing Régiment de Languedoc, supported by the Danish Fynske regiment. Lacking pikes, I hoped that these troops would be able to keep the French at arms length and avoid any Fisticuffs.


The Nassau Horse, perhaps being uncharacteristically impetuous charged into the Régiment du Lyonnais, sustaining casualties and shock.


They were repulsed with losses after a couple of rounds of combat. Elsewhere, the Danes were firing on the French Foot, with the Royal Scots waiting until they had an opponent within close range.


The Régiment de Languedoc took a lot of fire, suffering mounting shock and losses, compelling them to retire due to excess shock. Realising that they couldn't outflank the manor house, the French Horse moved to advance across the Anglo-Dutch left.


Having seen the Nassau Horse fail, both Woods' and Lumley's Horse moved to within charge distance of the French Horse. Woods' regiment came under musket fire, picking up Shock.


The Royal Scots poured musketry into the French Régiment de Champagne.


Finally, the English Foot Guards and Artillery move up towards the fighting. Lord Lymeswold directing the advance.


From the French side, the Anglo-Dutch centre begins to look menacing.


Maréchal de Cabecou sent the Régiment de Fimarcon Dragoons towards the French right, as the Gardes Françaises marched in line to fill a gap in the French line caused by the forced withdrawal of the Lyonnais Foot.


On the French left, the formidable Horse awaited the English charge. On the left of this brigade was the elite Régiment du Roi, in blue uniforms.


The two combats were bloody, with both English regiments coming off worse. Lumley's Horse suffered 50% losses and were compelled to retire back to the edge of Grolschbeek and were soon joined by Woods' Horse. However, they still protected the town, together with the remnants of the Nassau Horse.


The Anglo-Dutch centre was looking strong, with the French unable to make any headway against the effective musketry of the Danes and Scots.


At this point we decided to call a halt, because we were out of time.

What had I learnt from this game? 

Well, firstly the rule mods definitely do work for these large-scale encounters, especially with the amendments made since I first wrote and tested them. Secondly, the game does seem to give a reasonable brigade level simulation as opposed to the standard SP skirmish games. One might say that it is "Sharp Practice, Jim, but not as we know it".

I am a huge fan of Sharp Practice and the Shooting and Combat mechanisms are simple and effective and do translate well to use with larger units.

One thing that I think needs to happen is giving each brigade its own Deployment Point rather than having a single one for the entire army, because that leads to massive bottlenecks early on which prevent troops from deploying. The Dutch Garde Te Voet never really got anywhere near the battle.

I have rewritten my rule modifications, adding some clarifications, so I hope very soon to play through them again.

Thursday, 8 November 2018

Warband - first ever game with the Undead

It seems to be ages since I first bought my Undead Army from Pendraken and almost as long since I painted them up.

Anyway, last Sunday at the club gave me an opportunity to get the little guys on the table, in a Grudge Match battle scenario against Richard's Dwarves. In a Grudge match, the opposing commanders hate one another and have to join in combat to try and kill the other. In this scenario, both commanders are also rated as Impetuous.

We both fielded just over 500 points of troops. Here is my centre. The large purple dice shows my command points (CP) and the orange one my magic points (MP)


Here are Richard's Dwarves.


Here is my army. Just out of sight at the bottom are my Skeletal Riders.


Both forces began to advance. My plan was to use my Riders to clear the hill and sweep round to try and roll up Richard's line. It is nice to have a plan, although they seldom work.


Richard has Dwarf Noble Riders and Rangers on the hill.


I start realigning. My initial deployment was awful and needed changing. I need to get my Undead Lord into combat, but I also need to keep him supported on either side.


We get into combat. Richard hits one of my Riders units in the flank, and then my Zombies outflank his attacking unit.


The green jewels indicate that my Necromancer has successfully cast "Dominate the lifeless host", giving Hero status to all my in-range units. I use this spell a lot in the game, because, to be honest, the Undead need all the help they can get.


The commanders get into battle. This is the important part of the table. Everything else is secondary. My Undead Lord has the Powerful and Regenerate attributes. I think he'll need them.


Both leaders stands start losing casualties. This could go either way, but at the moment, my CP rolls are not too bad.


This is just as well, because elsewhere my line is under stress. These bony warriors really cannot take much punishment.


The Dwarf Rangers see off my Riders. Oops. 


But the combined power of my Zombies and the other Riders unit, cause a Dwarf unit to rout.


My only hope of winning is to defeat the Dwarf commander. Unhappily, my good CP rolls dry up but my repeated use of the "Dominate the lifeless host" spell at least gives me a chance.


The turning point comes when Richard gets two initiative rolls in a row, together with high CP and MP rolls. He uses "Spirit of the stone guardians" and "Granite Aspect" in successive rounds of play. With my Fear attribute rendered powerless, the Dwarves start to dominate and before long my Undead Lord is down to 0 MO and crumbles away into dust. Victory to the Hill Dwarves.

So, what did I think of the rules? 

Overall, I liked them. They are easy to pick up and the mechanisms are pretty simple to use. There are a couple of points that seem odd, such as units that are flank attacked don't get to turn and face their opponents after the first round of combat, but you get used to that. The action was pretty quick and you don't spend ages faffing about before getting into combat. I think that with a couple of more games under my belt, I'll find more things to like and, probably one or two more annoyances, but my feelings are pretty positive really. I like the unpredictability of the CP and MP system.

As for my army, well, what can one say about the Undead? I've never come across a set of rules where they are all-conquering and invincible, mainly because they need a lot of magical support to get keep them going, and we all know how unreliable magic can be in wargaming. On the plus side, they are fun to play with, mainly because you never know what will happen next. I'd have liked to be able to field my Wraiths and Spirits and my Catapults, but we were limited to a smaller army size because Richard didn't have any extra Dwarf units to field.