Monday 26 November 2018

A new Sharp Practice mini-project; French forces for the French and Indian War

The French and Indian War,  which was fought in North America between the British and French colonies began in 1754 and ran on until 1763. From 1756 onwards, it can be viewed as part of the much larger Seven Years' War. It started out as a conflict between the colonists and their local forces, but gradually regular troops from France and Britain began to be deployed as the conflict grew.

I am painting up a smallish 28mm French force for a Sharp Practice weekend in January next year at Bristol Independent Gaming. Each player has 65 points available for their troops and mine is going to consist of the following;

Leaders (total 22pts);

Status III - Capitaine Philippe Au Brion, the impoverished son of an Irish emigré military family. He is accompanied by a Musician (drummer) 10 pts
Status II - Capitaine Henri Thierry, 6pts
Status I -  Lieutenant Pierre Lardon, 3pts
                Lieutenant Jean Merluche 3pts

Troops (total 42pts);

3 groups of 8 Fusiliers of the Régiment de Guyenne (18pts)
3 groups of 6 Compagnie Franche de la Marine Skirmishers (24pts)

Support (total 1pt);

Burning torches 1pt (not sure how useful these will be)

This gives me a grand total of exactly 65pts.

Capt. Au Brion is the force commander and leads the fusiliers. He is assisted by Lt. Lardon. 

Capt. Thierry commands the skirmishers, with Lt. Merluche as his deputy.

Before starting on this little project, I looked around for the what I thought would provide the best fit for the kind of force I wanted to paint. I decided on the Warlord boxed sets of Compagnie Franche and Line Infantry, and I bought two of the latter, so that I'd have enough figures for my plans.

So far, I have completed the skirmishing force made up of troops from the Compagnies Franches de la Marine, autonomous companies of infantry who were attached to the  French Marine Royale and who served both on ships and as garrison troops in the various French overseas colonies. Until the FIW, these were the only regular French troops stationed in Nouvelle France, the French possessions in North America.

Anyway, here is where I am with this project so far.

First, here are Capitaine Thierry, on the left with the drawn sword and Lieutenant Merluche.


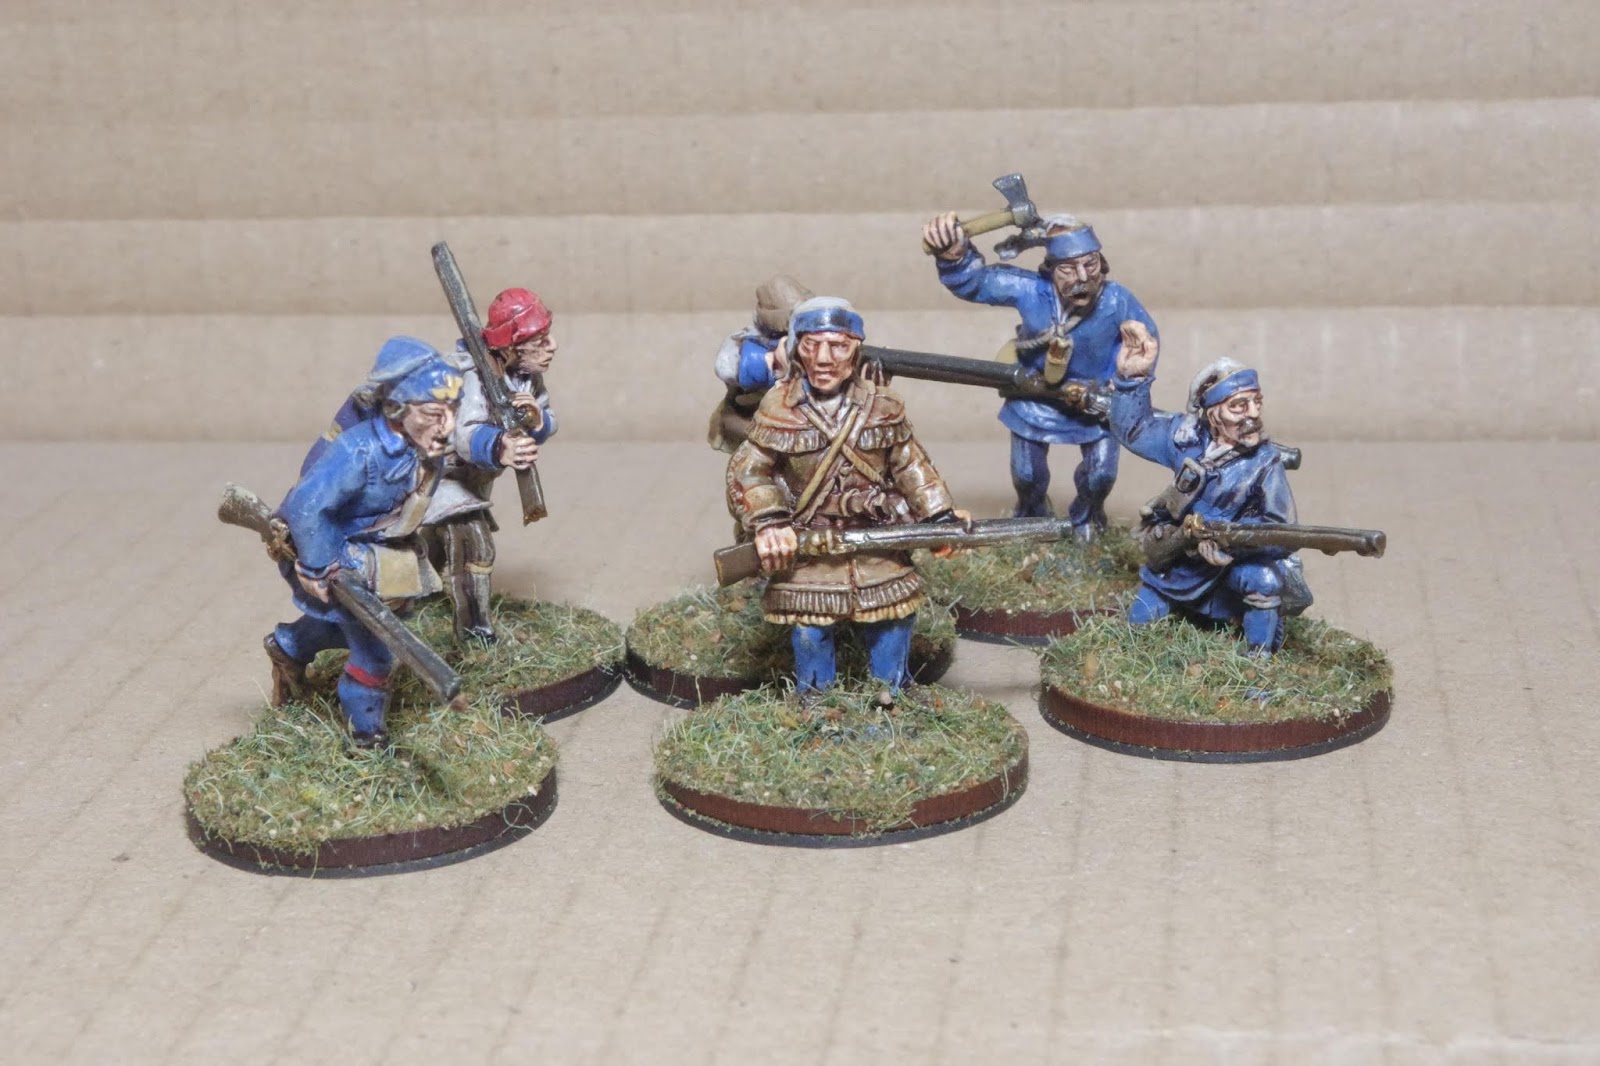
Next are their troops, in three groups of six skirmishers. Note that there is a lot of variation in the dress of these soldiers. in the first group I have added in one figure from the box of line infantry. This is because I didn't want any figures with an officer's gorget amongst the rank and file. I see this figure as being a low-ranking NCO, and therefore not a leader in SP terms. While on active service, the troops of the Compagnies Franches wore a relaxed service dress that included some items adopted from the Native tribes of the region. The hooded capot tunic was also popular. Troops were issued with swords, as were line infantry of the period, but these were often replaced with tomahawks.


Finally, I have painted up two Deployment Points. Both of these are resin items from Coritani Miniatures, whose products can be found here. Both of these DPs are using surplus figures. The one on the left is from the Compagnies Franches box and the other one, painted up to represent an office of the Régiment de Guyenne, is from the box of line infantry.


My next task is to get my line troops prepped and undercoated.

Two more tanks for What A Tanker!


Here are two more recruits to my Afrika Korps tank force for the TwoFatLardies What A Tanker game. On the left is a Panzer III with the longer 5cm KwK 39 L/60 gun, which means that it is  a Panzer III Ausf. J, although the ones with the longer gun were later reclassified as Ausf. L variants. The smaller tank on the right is, of course a Panzer II, armed with the 2cm KwK 30 L/55 cannon. As it has five road wheels, it is an Ausf. F variant, produced in 1941/42, rather than the earlier Ausf. C, so ideal as a vehicle serving in the North African campaign.

Both of these are Battlefront 15mm resin models. Although I am a big fan of plastic tanks, I think that for WaT resin models make more sense to me, because I don't really need to buy a box of five PSC models if I am only going to need one or two. I quite like the extra weight of resin vehicles for WaT.

Of course, when I eventually do something about my CoC in the desert project, these will be perfect for that too.

Monday 19 November 2018

The Shieldmaidens are in action. Two Saga AARs

On Sunday I finally got my Bad Squiddo Freyja's Wrath Shieldmaidens onto the table in an all-Scandi pair of battles against Clive's Anglo-Danes.

In the first game my force was as follows;

Freyja (War Leader)
One group of 4 Berserker Hearthguards
One group of 8 armoured Hearthguards
Two groups of Warriors
One group of Shieldmaidens (4 warriors led by a Valkyrie, plus a warrior with a War Banner)

My lack of ranged attacks left me at a clear disadvantage and my plans were massively disrupted by losing all my Berserkers to archery. From then on, I just had to attack, using Ullr and Thor abilities to maximise my hits. Unhappily, Clive was able to use the defensive abilities of the Anglo-Danes to pretty much negate my ability to score hits.

Net result: a win for the Anglo-Danes. Here are the pictures of the first battle. i think, from looking at these that my initial deployment was terrible.


Here are my short-lived and ineffective Berserkers.


Some spear-armed Warriors.


My main strike force. desperately trying to get into a better position.


With the Berserkers gone, Clive's defensive line starts to look like a problem.


My large Hearthguard unit gets ready to attack.


The Shieldmaidens led by the Valkyrie are completely useless here.


After two rounds of combat, my Hearthguards vanquish one of Clive's groups of 6 Hearthguards, but I am left in a weak condition in a dangerously exposed place.


Clive's bow-armed Levies and a group of Warriors combine to cause havoc to my spear-armed Warriors. After six rounds of play, I am defeated.


Here is the second game. I decided to replace the Berserkers with 12 Levies with bows.


I have retained the Shirldmaiden unit and have two groups of Hearthguards, one of 4 and the other of 8.


My other unit is one of 8 Warriors.


Things start off much more equally, with my archers targeting one of Clive's groups of Warriors.


I send my Warriors into melee with the archers. This is quite a success, forcing them to retreat.


Elsewhere, the two battle lines watch each other warily, no doubt exchanging insults and expletives.


My Warriors were attacked by Clive's Warriors. I use Ullr and am victorious. His Warriors are destroyed, but once again, I am left weakened and in range of the bow-armed Levies.


Battle is soon joined in the centre. My large group of Hearthguard charge in and destroy one group of Clive's Anglo-Danish Hearthguards, but are then themselves wiped out. 


I send in the Shieldmaidens, who are all killed except for the Valkyrie. However, they have weakened Clive's line. My smaller Hearthguard group charges, but is defeated. The battle is over. The Vikings have lost again.


I wasn't too upset at losing both games, because they were fun to play. The Vikings really do have to attack and try and cause maximum damage, which I generally managed to do quite regularly, but the real strength of the Anglo-Danes comes from their abilities to roll a lot of Save dice, which they also managed to do pretty regularly.

My main mistake was the way I used the Loki ability. I kept on forgetting to make it the first ability, but when I did, it really helped make a difference in melee.

These two armies are pretty much two sides of the same coin. One attacks ferociously and the other defends doggedly.

Reveille 2018

This coming Sunday, 25th November is the Lincombe Barn Wargames Society's annual show, Reveille II.


As you can see from the picture of the flyer above, the show is at the usual address, the Downend Folk House, Overndale Rd, Downend, Bristol BS16 2RW and doors open at 10am. 

The prices for admission are:

Adults (18 and over) - £3.00;
Juniors (13 - 17) - £1.50; and
Under 13 years - free.

There will be a large number of trade stalls, including Ironclad Miniatures, Magister Militum, Warlord, Great Escape Games and many others. 

Monday 12 November 2018

I have finally finished all my Freyja's Wrath shieldmaidens

Well, it has been a bit of a long job, mainly because I really wanted to do these lovely figures justice, but I have now finished them. I have enough for a Saga Viking warband, with some optional changes to the basic band.

Anyway, here are the final sets of figures. First, here are 12 archers, who will be classed as bow-armed Levies for Saga;


Next, eight unarmoured Warriors with axes;


And finally, eight unarmoured Warriors with spears;


Obviously, I will be fielding these as Vikings, but they could also serve as Anglo-Danes or Jomsvikings (without the archer levies).

Regarding the colour palette I used, once again, I wanted to keep a few unifying touches, therefore, the spear-armed shieldmaidens have predominantly black and yellow shields and the ones with axes have shields that are mostly red and black. I also kept to a basic set of three or four main colours for the clothing and I did a fair amount of dry-brushing to tone down the brightness of their appearance. I think that this has worked pretty well, they are not too subdued overall, but they are reasonably understated.

Now they are finished, I have a game of Saga arranged for next Sunday at the club.

These will also find a place in my Dragon Rampant plans for 2019.

Thursday 8 November 2018

Warband - first ever game with the Undead

It seems to be ages since I first bought my Undead Army from Pendraken and almost as long since I painted them up.

Anyway, last Sunday at the club gave me an opportunity to get the little guys on the table, in a Grudge Match battle scenario against Richard's Dwarves. In a Grudge match, the opposing commanders hate one another and have to join in combat to try and kill the other. In this scenario, both commanders are also rated as Impetuous.

We both fielded just over 500 points of troops. Here is my centre. The large purple dice shows my command points (CP) and the orange one my magic points (MP)


Here are Richard's Dwarves.


Here is my army. Just out of sight at the bottom are my Skeletal Riders.


Both forces began to advance. My plan was to use my Riders to clear the hill and sweep round to try and roll up Richard's line. It is nice to have a plan, although they seldom work.


Richard has Dwarf Noble Riders and Rangers on the hill.


I start realigning. My initial deployment was awful and needed changing. I need to get my Undead Lord into combat, but I also need to keep him supported on either side.


We get into combat. Richard hits one of my Riders units in the flank, and then my Zombies outflank his attacking unit.


The green jewels indicate that my Necromancer has successfully cast "Dominate the lifeless host", giving Hero status to all my in-range units. I use this spell a lot in the game, because, to be honest, the Undead need all the help they can get.


The commanders get into battle. This is the important part of the table. Everything else is secondary. My Undead Lord has the Powerful and Regenerate attributes. I think he'll need them.


Both leaders stands start losing casualties. This could go either way, but at the moment, my CP rolls are not too bad.


This is just as well, because elsewhere my line is under stress. These bony warriors really cannot take much punishment.


The Dwarf Rangers see off my Riders. Oops. 


But the combined power of my Zombies and the other Riders unit, cause a Dwarf unit to rout.


My only hope of winning is to defeat the Dwarf commander. Unhappily, my good CP rolls dry up but my repeated use of the "Dominate the lifeless host" spell at least gives me a chance.


The turning point comes when Richard gets two initiative rolls in a row, together with high CP and MP rolls. He uses "Spirit of the stone guardians" and "Granite Aspect" in successive rounds of play. With my Fear attribute rendered powerless, the Dwarves start to dominate and before long my Undead Lord is down to 0 MO and crumbles away into dust. Victory to the Hill Dwarves.

So, what did I think of the rules? 

Overall, I liked them. They are easy to pick up and the mechanisms are pretty simple to use. There are a couple of points that seem odd, such as units that are flank attacked don't get to turn and face their opponents after the first round of combat, but you get used to that. The action was pretty quick and you don't spend ages faffing about before getting into combat. I think that with a couple of more games under my belt, I'll find more things to like and, probably one or two more annoyances, but my feelings are pretty positive really. I like the unpredictability of the CP and MP system.

As for my army, well, what can one say about the Undead? I've never come across a set of rules where they are all-conquering and invincible, mainly because they need a lot of magical support to get keep them going, and we all know how unreliable magic can be in wargaming. On the plus side, they are fun to play with, mainly because you never know what will happen next. I'd have liked to be able to field my Wraiths and Spirits and my Catapults, but we were limited to a smaller army size because Richard didn't have any extra Dwarf units to field. 

Thursday 1 November 2018

Blow The Bridge - A CoC AAR


I wrote this scenario to play a game of Chain of Command with Craig at the club last weekend. Although Craig has the CoC rules, he'd never played a game before.

The British are advancing across the relatively flat and open countryside of the Netherlands. Their objective is to capture a bridge over a canal, which will allow armoured units to cross the canal and outflank a strong German defensive line.

The British forces available are;

1 rifle platoon (HQ plus three sections, as per the rulebook)
1 recce section (2 Universal carriers with Bren teams and a junior leader)
1 Wasp flamethrower carrier

The German objective is to defend the bridge for as long as possible, which will allow an engineer section to place charges.

The German forces available are;

1 rifle Zug (HQ plus three sections, as per the rulebook)
1 tripod-mounted MG42
1 4-man engineer section. Their role is to plant charges, not fight. If fired upon, they count as being in light cover. They will active as for a team without a leader or can be activated by the German senior leader.

The Germans also have two lengths of barbed wire, two prepared defensive earthworks and a single minefield. These will be placed after the Patrol Phase.

To win the scenario, the engineer team must be on the bridge to place the charges. Placing a charge takes two actions. Each time the team uses two actions while on the bridge, place one small dice on the bridge to represent a charge. Once four charges are in place, the team must withdraw to safety to blow the charge. The charge can only be blown by first spending a CoC dice. To blow the charge roll 1D6. If the roll is 1 or 2, the charge doesn’t go off. The German player can attempt to blow the charge again using another CoC dice.

The rest of the German troops must prevent the British from;

1) crossing the bridge
or
2) killing the engineer team

In the patrol phase the Germans will use three patrol markers and the British will use four (because they are attacking). The British will also have two free patrol moves before the patrol phase properly commences.

The game will be play across the width of the table. The canal will be down the centre of the table, with the bridge placed in the central third of the table. The canal can only be crossed by using the bridge.

The British will start the patrol phase from either the left corner or the right. (roll 1d6 1-3 left, 4-6 right)


The Germans side of the table will be in three sections left, centre and right To see where the Germans will start the patrol phase roll 1d6 (1-2 left, 3-4 centre, 5-6 right)


The table was laid out as shown below. The canal and bridge were my own pieces. The rest came from the club's stock of scenery and terrain. I am pretty sure that the Dutch-style buildings are by Hovels. Both sets of troops were from my 15mm Peter Pig late war collection.


The Germans would be defending from the side of the canal with the hamlet, with the British attacking from the other side of the canal.  


This shot below shows where the Germans placed the minefield, barbed wire and earthworks once the patrol phase was over. You can see the early deployment by the British player (me).


The carriers start to arrive. 


I deploy more troops. My aim is to secure the canal bank either side of the bridge, where I can enfilade the bridge itself. My plan is to hold the Wasp carrier back and then charge it at the bridge to force the defenders back.


Craig began to deploy the Germans, planning to get troops into the static defences quickly.


Elsewhere the tripod-mounted MG42 starts finding its range and causes shock and casualties on my right-hard infantry section. My plan is not going according to expectations.


The engineers get onto the bridge. I really need to start targeting them, but I am worried about that MG42.


I get a section up into the ruined buildings by the canal. Unhappily, there are defenders just across the water.


I deploy a Bren team from one of the recce carriers. My plan is to clear the German bank here, giving me a chance to shoot at the engineers.


I really need to neutralise the German infantry on my right, who are forcing me to withdraw. The answer is smoke from the 2" mortar.


I open fire on the Germans opposite the bombed-out houses, then hit them with more smoke. Worryingly, the engineers are getting on with the job of rigging their charges on the bridge.


One more activation sees them place the final charge, and I've still not managed to do anything to stop them. Craig has a CoC dice too.


He uses the CoC dice and rolls for the effect of detonating the explosives. With a roar, the bridge blows up. The Germans have won. 


OK, so that was really a pretty quick game. It would make an excellent start to a mini-campaign, but I think that the scenario needs tweaking to make it harder for the defenders. I think that only needing four charges made it too quick and easy. Perhaps it should have been six? Also, I think that once the CoC dice was available, the probability of the bridge blowing was pretty high. Maybe it should have required a 4+ to blow the charges? On reflection, I also think that the engineers should only have been deployed by using a CoC dice, rather than by the SL bringing them onto the table. I am thinking that perhaps they should have come on from the edge of the table in a truck.
Finally, I think I was too cautious. I should have sent the recce carriers hell-for-leather at the bridge to take control of it. Either that, or I should have taken a tank instead of the carriers. I reckon having a tank would have given me the advantage. A Cromwell with the 95mm CS howitzer would have been useful, or maybe just a Churchill IV with a 75mm could have tipped the balance, so long as I kept it out of Panzerschreck and Panzerfaust range.