Showing posts with label skull beads. Show all posts

Wednesday, 13 September 2017

An ASQL AAR - Alien Imperials vs Human Colonials

On Sunday my Alien Imperial forces made their debut against a Human Colonial army last Sunday at the club. The Human commander was Alex Self, the author of the Alien Squad Leader rules.

We played a 200pt game with the chosen scenario being Envelopment. As the defender, Alex had two objectives to defend and, as the attacker, I had a second deployment zone, which I decided would be behind the jungle area at the bottom of the first photo.


Alex deployed first, with the bulk of his troops in the two built-up areas which represented the objectives he would be defending. He also had two groups of civilian refugees to escort from the field of battle. He had two defence turrets in the objective areas and these worried me a fair bit.


I decided that I would have to place a threat on my right flank to tie down his tanks while assaulting the lefthand objective with waves of tribal auxiliaries, supported by droids from my flanking deployment area. The bulk of my alien infantry, supported by heavy weapons were on the right;


and I had two lines of Tribals on the left. The Beasts would be able to advance rapidly. so long as the commander and sub-commander on this flank could motivate them to advance. The second alien wave also had some Shooters.


Before long, the scary Beasts started to close in on the objective.


The droids began to deploy behind the cover of the jungle as the Beasts prepared to assault the gallant Human defenders.


This combat would go on for a number of rounds and prove to be decisive.
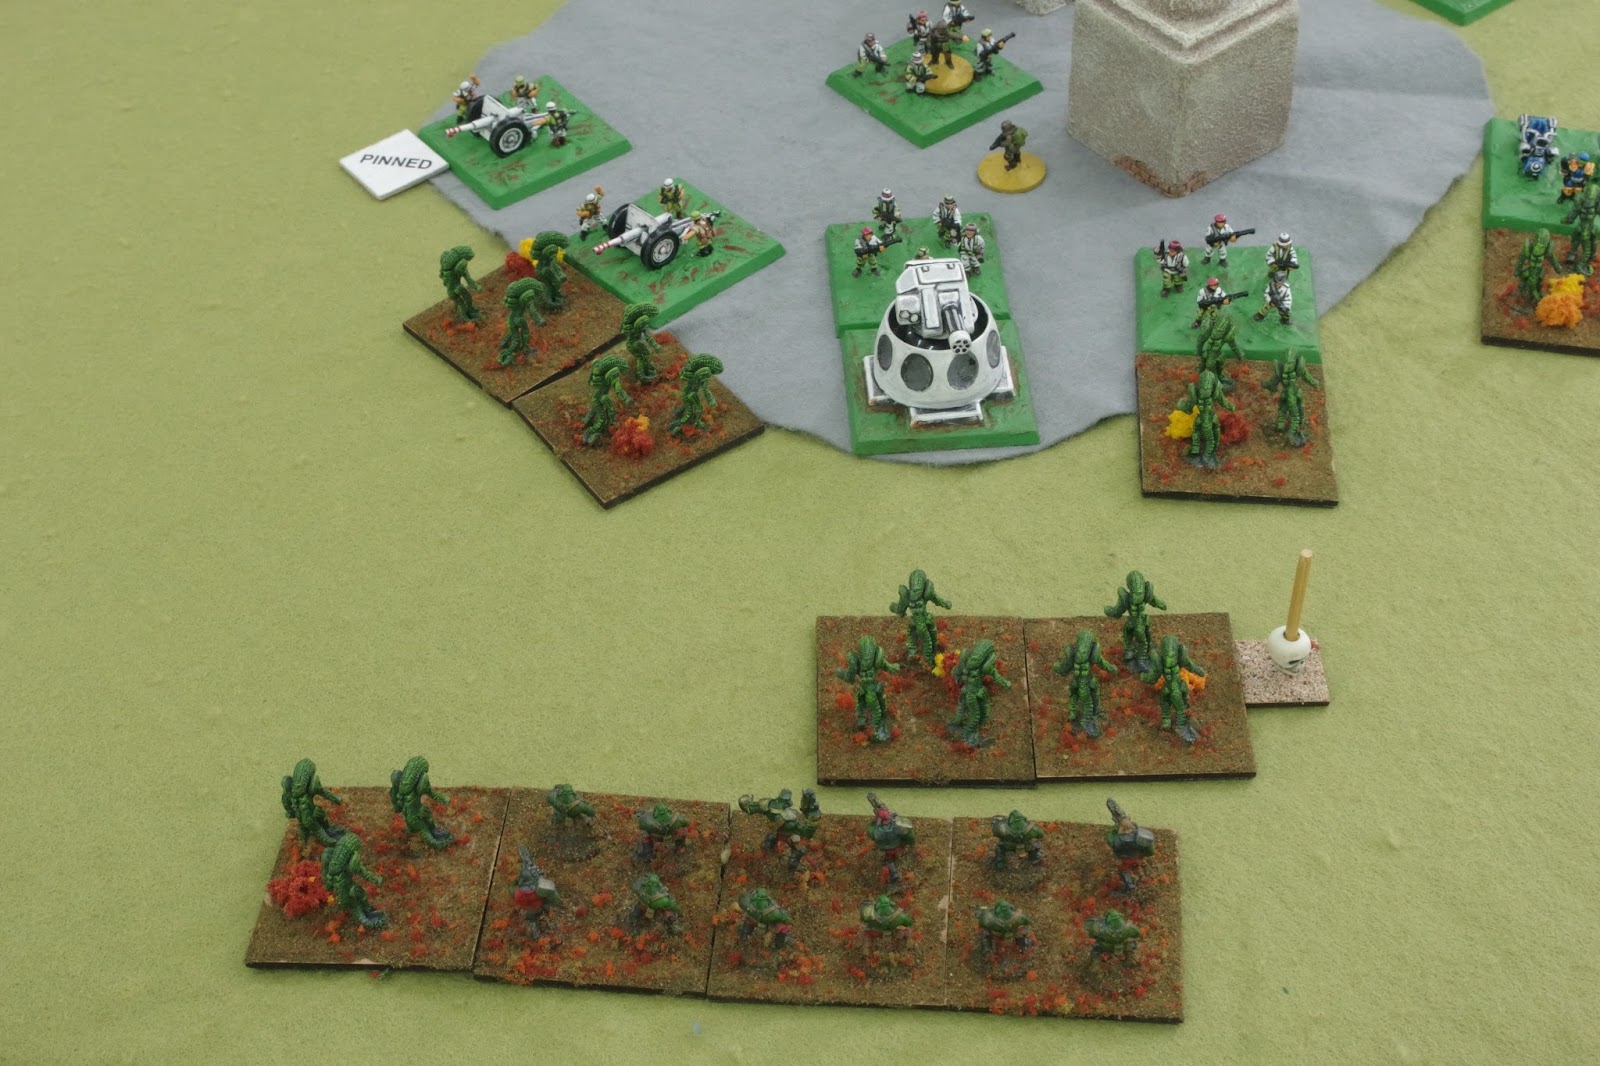

The Tribals and Beasts took casualties, but they also caused a lot of damage, gradually whittling down the defenders.


Elsewhere, Human Colonial Police and Defence Troops escorted the civilians away from the fighting. I ignored these. My aim was the two objectives, with most of the fighting going on around the buildings on my left. Fire support from my heavy droids kept the Human artillery pinned and this allowed the Beasts to assault them.


Finally, the breakthrough came and Aliens were inside the built-up zone. Over on my right, which was pretty much a stalemate for a long while, my heavy weapons managed to destroy the defensive turret and cause some damage to Alex's tanks. 

Below, you can see the Human Floating Platforms (with heavy weapons) advancing into firing range. These managed to cause casualties to my Alien Infantry and Elite power-armoured troops who I had deployed to threaten the Human rear.


Finally, my Tribals and Beasts destroyed the Human heavy weapons and defensive turret, which enabled me to unleash my droids without fear of being knocked out. Slowly but inexorably, the Aliens wore down the Human resistance. First, the lefthand objective fell to my forces and I ordered my right flank to advance on the righthand built-up area. Below, you can see the Humans deploy more infantry from an APC (which would later get shot to pieces by my droids).


The Alien troops closed in on the righthand objective. As I had already managed to destroy enough Human stands to take them to break point, all I needed to do was outnumber the Human defenders in the second objective to win the game.


And, after a few delays, this happened when my robot infantry won a combat against the Human defenders and I advanced a heavy droid into the built-up zone, together with some infantry who had managed to destroy a tank in combat..


So, as a first game with this new army, I was well-pleased with the outcome. My plan worked pretty well and the Alien Beasts proved to be amazingly effective at the task I'd set them, which was to draw fire and get into hand-to-hand combat quickly. When I started to use my Alien Infantry, they proved to be a real shooting threat with their superior energy weapons (which allows them to roll three D6 and discard the lowest scoring one). I think that using droid troops is also a good idea, as it lets you use your command stands to keep the Tribals moving forwards as much as possible.

Monday, 12 June 2017

Another outing for my Nine Years' War armies

Following the last playtest of my modifications to the standard SP rules, I was keen to have another game with the revisions I'd made since the last battle. Luckily, young James at the club was happy to take the field commanding the Anglo-Dutch army while I, once again took control of the legions of Louis XIV. Both armies are made up from the excellent NYW 15mm figures from Lurkio.

James wasn't at all familiar with the Sharp Practice rules, but turned out to be a quick learner, as well as a pretty keen opponent, as he demonstrated as the battle unfolded. The table was laid out with few obstacles, because the main aim was to get large numbers of regiments into combat with the minimum of delay. The French were on the left and the Anglo-Dutch the right in this photo.


Both armies took advantage of the Moveable Deployment Point available to Dragoons (in my mods), which allowed one wing of the army to deploy 24" away from the main DP. James, especially, took advantage of my column march rule to get his Foot across the table as quickly as possible. Something else that we agreed should be allowed was for the senior general to be able to activate units assigned to his two subordinate commanders. This is a change that I'll certainly keep in my modifications for future use, because it gave the feel of a large-scale battle being commanded by a senior general or even a Marshal of France. However, on reflection, I think that this feature should be restricted to the senior leader only being able to use a maximum of half his activations for this purpose. After all, he still has to command his own troops.


The Anglo-Dutch deployed first, with Artillery, Dragoons and the Earl of Oxford's Horse taking a dominant position in the centre. The French were next, with the senior French general deploying his elite Gardes Françaises Foot and Régiment Du Roi Horse, plus two other foot regiments directly in front of the French camp (a.k.a the primary DP).


These foot regiments would take the brunt of the Anglo-Dutch assaults. The next deployment was the second Anglo-Dutch command, mainly Horse, supported by the Scottish First Regiment of Foot.


This was soon matched by a deployment on the French left, with Dragoons, Foot and Horse all emerging to counter the Anglo-Dutch Horse.


However, in the centre, the Anglo-Dutch began to advance against the French, with several regiments in column.


The French centre soon began to suffer casualties from the Anglo-Dutch artillery


The battle began to hot up pretty quickly as the two armies joined battle. Remember that in Sharp Practice, muskets are pretty ineffectual except at close range.

Note the complete absence of the French right wing. This was beginning to become a major worry.


Hurrah! The final French troops finally began to arrive, just as the battle in the centre started to become serious.


French musketry caused havoc with the advancing Allied columns, as the Earl of Oxford's Horse charged the Gardes Françaises.


However, the Horse came off worse in this fisticuffs and were effectively destroyed as a useful force. Over on the French left, a colossal cavalry battle was about to begin. This carried on for several rounds of combat with both sides becoming depleted, but eventually leaving the French with the advantage.


With both sides becoming fully-engaged shock and casualties mounted on both sides.


Finally, the French artillery took up position on a hill and began to fire upon the Danish foot on the Allied left.


Although they had taken fire, the Allied regiments in the centre looked strong.


On the left, the Régiment Du Roi rode to reinforce the weakened French Horse.


On the French right, musketry and artillery caused many casualties on the English First Foot Guards.


At this point, we ran out of time. The battle was pretty evenly balanced, with two lines of infantry, supported by artillery on hills, giving them a good line of sight across the battlefield. We discussed the way things had gone, noting that the Force Morale of the French was higher. In fact, the Allies were a fair bit closer to entering the Red Zone, but the French centre had been weakened to such an extent that it seemed unlikely that they could break through against the strong Allied defensive line, so we called it a draw.

My reflections on the revised modifications are that I think I have a workable way of using my NYW armies within the SP Lardie universe, which I think is a good thing. If nothing else, it means that I can sell my FOG:R rules at next year's club Tabletop Sale.

The mods I've written give a decent playable game, but you definitely need plenty of time to conclude a battle, which seems fair enough with so many units on the table. I'm happy with the result, which, at the end of the day, is all that really matters. I think that I'd never have been able to get this project resolved without the excellent SP rules, written by Richard Clarke. His simple to grasp and clever mechanisms have been easy to adjust for my larger armies. It really says exactly how good these rules are.


Monday, 29 May 2017

A Nine Years' War AAR - playtesting my Sharp Practice mods

I mentioned a few posts ago that I had been developing some modifications to Sharp Practice so that I could fight large scale battles using my NYW armies, which were based up for FOG:R rules.

Last Sunday at the club I had the chance to play through a battle using these mods, the idea being to playtest what I'd written and see where I needed to tweak them to make them more playable. So, many thanks to Clive, who took the role of the Anglo-Dutch commander. I commanded the French.

The battlefield was relatively open, giving the opportunity to manoeuvre the troops more easily.


The Anglo-Dutch arrived first, with a brigade containing dragoons heading towards the French left.


French troops, also containing dragoons quickly deployed to counter them.


Note the Dutch Garde Te Voet, with their regimental gun.


On the right, regiments of Horse began to advance, with Woods' Horse (green standard) receiving fire from the Fimarcon Dragoons.


Elsewhere the Régiment de Villeroy charges the Dutch Nassau Horse in column. Over here on the French right flank, the Horse continue to advance until stopped by accurate Anglo-Scottish musketry.


Woods Horse charge the French Dragoons, wiping them out.


The French camp is a mere canter away now.


The Anglo-Scottish Brigade arrives, supported by guns and Fusiliers.


Woods' Horse attack the French camp but are beaten off by musket fire from the Fusiliers du Roi.


This allows the main body of the French army to deploy, including the Gardes Françaises and the Régiment du Roi, both resplendent in blue uniforms.


Woods' Horse are powerless and take casualties from short-range musketry.


Lumley's Horse advance, supported by the Garde Te Voet


The Anglo-Dutch Horse are in the thick of it as the Régiment de Navarre are in combat against the Earl of Oxford's Horse


However, as the Régiment de Rohan reinforce the French left, threatening to charge the English dragoons a stalemate develops.


The battlefield is becoming congested but the French centre looks strong.


Eventually, we had to call it a day as we ran out of time.

So, an inconclusive result, which is kind of appropriate for the period. Many battles ended up with neither side having the upper hand, which is why there were so many sieges and a lot of fruitless marching and counter-marching to try and gain an advantage.

Some notes about the playtesting. Firstly, it was great to have the chance to see how my ideas worked out in an actual battle. Early on, it became apparent that my initial ideas gave the Horse far too many advantages in Fisticuffs, so I amended them as the game progressed, which evened things out a lot. We also agreed that the standard rules for artillery in SP made the guns far too powerful, so we agreed to halve the number of dice rolled for each gun. This gave a much better result.

We also decided that troops formed up in column should be allowed a D6+3 move, rather than a simple D6, but that they would only be allowed to use the front two bases in Fisticuffs.

I think that we will need to play through these amendments again, but overall, these changes do seem to make for a fairly reasonable game with large armies that look attractive on the table.