Tuesday 31 July 2018

Back from holiday - time for another Alien Squad Leader AAR

Sunday was my first wargaming activity since the beginning of July and it was a 200pt game of Alien Squad Leader with Owen at the club. Owen has recently brought his Human Imperial Strikeforce army up to 200pts, so I knew that I'd be facing that particular enemy. I decided to take my Alien Imperial army, but with a few modifications since its last outing, back in December last year. I decided to drop the power-armoured Elites and replace them with a Phase tank with an aiming device and a homing missile. I thought that the extra long-range firepower might come in handy.

The battle scenario we fought was Scenario 4 - Envelopment. This meant that Owen could reserve up to four stands to deploy from a flank and I had to defend an objective. As the defender, I set up the table. Most of the cover was on my side, understandably. I was unsure where the Human reinforcements would arrive, so I thought it might be useful to station some robotic forces on the left, where they could operate without any need for a command stand.


In the centre I had two urban areas. In the left-hand one I had my phase tank and some troops and a heavy weapon stand. The right-hand one was the objective I was defending.


I put my other Heavy Droid in the objective area, supported by another H/W stand, the Force Commander (Inspirational Leader) and some more infantry (behind the buildings).


I deployed more infantry on my right flank and had all my Trained Beasts and Tribal Auxiliaries, including a sub-commander behind the main lines.


Before long, Owen's Strikeforce advanced, taking advantage of its Sudden Strike rule.


I began to move troops up to counter, hoping that my infantry on the right flank hill could defend against the deployment point there.


Things began to go well for me. My Superior Energy Weapons were scoring plenty of hits on the power-armoured Humans. I was worried about the light vehicles emerging on my right flank, though.


I brought the phase tank into play, scoring a few hits, destroying a Human APC and pinning the Human heavy weapons team in the ruins across the table. My Heavy Droids were in play, but the Robotic infantry had nothing to do. I tried to being them closer to the action. 


My Trained Beasts despite a few stands getting shot up, crashed into hand-to-hand combat with an APC, ripping the vehicle to pieces with their claws and generally going on a rampage. This, for me was the turning point in the battle. The Beasts made mincemeat of stand after stand of Humans (who had already taken a few hits). I did lose the most successful set of Beasts in the end, but the rest of the Beasts went into a mad fury, ripping the light vehicles to pieces and forcing the Humans to breaking point.


Eventually I only needed to knock out one more Human stand to force Owen's troops to break. I managed to do this with some accurate fire from a H/W stand. Game over.

This was a tricky battle really, a lot less one-sided than it appears from the pictures. If Owen had succeeded in his plan of unloading his troopers and having them storm into the objective, I am sure that he could have won, but my Beasts really were on top form. In the end I only lost two stands of Beasts and one of Imperial Infantry.


Monday 23 July 2018

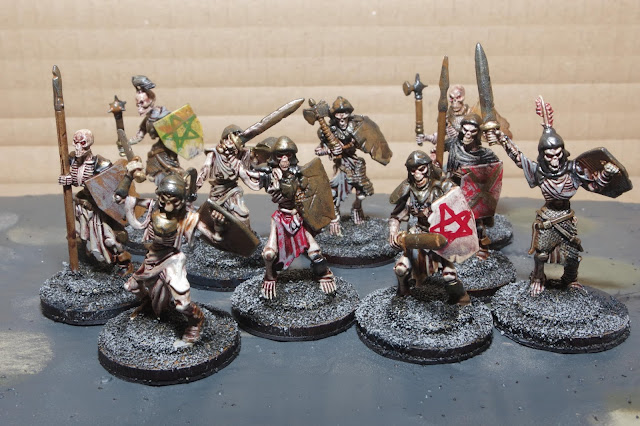
North Star plastic Undead Encounters figures

I've had these figures lying around for about a year now. I assembled and undercoated them last September and then set them aside while other things leapfrogged them in the painting queue. However, I did do bits of work on them here and there and just before I went away on holiday I set some time aside to finally finish them off.

First, here are three Zombies, four Ghouls, a skeleton erupting from a grave, a skeleton Giant Rat and a marker. I enjoyed painting these, lots of scope for decaying skin tones and exposed rotting flesh and organs. 


Secondly, here are ten skeleton warriors. These were also fun to paint, with a liberal application of Light Rust wash which is actually intended for vehicles, but looks pretty good on their weapons and armour.


All these figures started off with a coat of Army Painter Skeleton Bone spray and the rags and skin tones were built up with blended colours. Armour was gunmetal, brass and copper dry-brushed onto black. Finally, before finishing them off with rust wash, they all got an inking with Windsor & Newton Peat Brown. Once everything was dry, I did the bases with black railway ballast, which was dry-brushed in pale grey and then they were spray varnished.

Thursday 5 July 2018

Another ACW Sharp Practice AAR

This game was a few weeks ago now at the club, between Brian, commanding the Union side and my force of Confederates. Both sets of troops were my Peter Pig 15mm ACW ones. The buildings and fences were also mine. The rest of the terrain was the club's.

We used forces for 1864 from the Sharp Practice rulebook, plus a couple of basic supports (medics, extra Status I leaders);

CONFEDERATES, 1862‐1865
Leader, Status III
Three Groups of 8 Infantry, Rifled Muskets
Leader, Status II
Two Group of 8 Infantry, Rifled Muskets
Leader, Status I
One Group of 6 Skirmishers, Rifled Muskets
Leader, Status I
One Group of 6 Skirmishers, Rifled Muskets

UNION FORCE, 1863‐1865
Leader, Status III
Leader, Status I
Three Groups of 8 Infantry, Rifled Muskets
Leader, Status II
Two Group of 8 Infantry, Rifled Muskets
Leader, Status I
One Group of 6 Skirmishers, Rifled Muskets

The mission selected was Scenario Two; Sweep The Table, and the table was laid out as seen below. The Confederate deployment was from the bottom left in the first photo;


The Union force would deploy from the road at the bottom right;


We modified the objective so that the sweeping force's objective would be capturing the opposition's deployment zone. The Confederates were the sweeping force due to their higher Force Morale. I began by deploying skirmishers. I had a plan, and that involved tying the Union troops down as early as possible.


The Union troops began to arrive; skirmishers to the fore and a column marching behind.


My sharpshooters were soon in action, sniping away from the edge of the cornfield and causing casualties on their opposite numbers.


I quickly brought on my second group of skirmishers who moved up to add their fire.


Meanwhile the Union main force slowly began to deploy behind the skirmish screen.


My main force began to arrive, two groups advancing in line to take up a position on my right flank, while the rest moved to my left.


The main Union firing line advanced towards the central farmstead.


My left-hand skirmishing group moved up to threaten them.


My main force began its march along my left flank. So far, things were working pretty smoothly.


My right-hard skirmishers came under sustained fire, taking shock and a casualty. Their leader was able to rally off some shock and they advanced to fire again.


Hiding in the long corn, they began to pepper the Union troops with accurate musketry, causing casualties on the two groups advancing along the road.


My troops advanced slowly.


Eventually ending up as a three group formation behind a line of snake fencing.


However, this was a feint, and the formation moved off on a flanking march, behind the dense forest on the Union right.


Back in the centre, my advanced group of skirmishers, much reduced, were skulking in a patch of green corn.


I needed to keep the Union force engaged along the road.


The fighting was keeping the main Union body in a defensive line on a hill and the other two infantry groups were holding the chapel and the road junction.


My marching column on the left carried on moving through the woods.


I began to advance in the centre through the cornfields.


My flanking force finally deployed into line formation, ready to threaten the deployment point.


My left-hand skirmishers kept up their fire on the main Union body. So far, so good.


Finally, the Union realised the threat on their right. Groups of infantry began to move across to counter my advance.


This led them to a strong position in the corn and trees, where they were able to engage the Confederates.


This developed into a firefight, with both sides suffering casualties and shock.


Time was running out, but Union Force Morale was plummeting and casualties and shock were mounting. Having all but surrendering their left and centre, the Union was struggling to defend its deployment point.

At this point, we called a halt, agreeing that the outcome was a victory for Johnny Reb.

Wednesday 4 July 2018

The club Frostgrave League gets under way

A while ago some of us at the club decided to start a monthly Frostgrave "league" and last Sunday we had our opening fixture. We all started with vanilla, no experience wizards. My band is based around an Elementalist wizard and her apprentice, and for this initial outing their band of thugs and bruisers contained a Man-at-Arms, an Infantryman, an Archer and four Thugs. All my minions are Northstar plastics, a mixture of Barbarians and Cultists and my female magic users are from Bad Squiddo Games.

I've previously posted pictures of all my Frostgrave fighters and the wizards, so I'll head straight to the action.

The table was decidedly non-frosty, perhaps the summer has come to the city and the snow has melted? 


The central area was intended to be a kind of sacred enclosure, where Teleportation wouldn't work, which was packed with treasures. Players had to be occupying the enclosure at the end of the game to get a share of the loot. There were also four other treasures scattered around the table.


My Elementalist has the Raise Zombie spell, which she managed to cast out-of-game, giving the band an extra figure.


My apprentice decided to hang around on a street corner with two burly chaps.


The rest of my ne'er do wells were going to make a dash for the centre. What could possibly go wrong?


Before long, I found the first treasure chest. I decided that my Zombie, being a rubbish fighter should pick it up and shamble off the table as soon as possible.


Elsewhere, Andy's wizard cast Fog, and my apprentice and her two chums used the cover to advance quickly along the lane.


Unfortunately, picking up the treasure caused the arrival of a terrible monster, an Ice Toad, clearly also in a summery mode.


Failing to research the beast, I sent my man-at-arms into combat, where he was summarily dispatched. Oops, that wasn't in the plan at all.


I needed to make sure the Ice Toad didn't gobble up my Zombie, so I pushed a thug into battle.


Meanwhile, two of my other minions managed to get into the central enclosure. All I had to do was keep them there to get a share of the loot.


Amazingly, my thug triumphed over the Ice Toad, giving me a chance of getting the treasure away. My wizard also managed to cast Wall (represented by a line of dice, blocking off my troops from Owen's band.


The centre was getting crowded as Owen got troops into the enclosure, being unable to creep up around my flank due to the Wall.


Andy's froggy fighters began to emerge. You could say that it was a Fog Full Of Frogs.


General mayhem ensued in the central enclosure.


I stopped taking pictures at this point, so I have nothing to say about Richard's band, who I never got into contact with, although I did try to bespell a couple of them, unsuccessfully. Unhappily, I lost a couple more thugs and my wizard came perilously close to being eliminated by a Grenade spell, but when things came to a conclusion, I came away with two treasure chests (containing a total of 350 coins and 2 grimoires) and 120 experience points, meaning that my wizard has gained a level.

I also lost a thug killed but rolling for all my other casualties, I managed to have them all recover ready for the next adventure.