Showing posts with label IABSM. Show all posts

Wednesday, 7 October 2020

What is the wargaming equivalent of writer's block?

 Painter's Ennui, perhaps? Well, whatever it is, I've got it. 

I haven't picked up a paintbrush in weeks, and that isn't because I've run out of things to paint. It is just that I seem to have lost my enthusiasm. Every day, I wake up with the intention to finish something off, or start something new, but by the time I've had my breakfast, something seems to switch off and I end up just reading a book or wasting time on the internet. 

I am still playing games on Sunday afternoons; the club is active again now and working fine under Covid-19 restrictions, although I'm not not currently taking any pictures of the games, because that means taking off my visor, because it is impossible to use an SLR while wearing one. I've played a bit of Sharp Practice, some Chain of Command and I even have a game of I Ain't Been Shot, Mum planned for this weekend. Gaming isn't the issue. Just painting.

I think I just need to finish off my last lot of Roman cavalry and then I'll feel more positive about prepping up something else. To be honest, I think that I need a break from Early Imperial Romans.

Monday, 2 March 2020

BIG Winter Wonder Lard

Leap Year Day saw a feast of Lardy Goodness down at Bristol Independent Gaming at Winter Wonder Lard. The whole day was given over to a range of TFL games and I ran a game of Chain of Command using the Big CoC amendments to allow multiple players on each side. I will write about this in a separate post, but here I want to give an overview of all the fun. There was everything from Chain of Command to Kiss Me, Hardy, taking in Sharp Practice, I Ain't Been Shot, Mum, What A Tanker, Bag The Hun and Richard Clarke running another demo of Infamy, Infamy, which many of us are itching to get our hands on as soon as the rules are published. 


There were some lovely tables on display, spanning many periods, including Chain of Command in the Spanish Civil War and at Gallipoli in the Great War. There was also a new squad-level game written by Ioan Davies-John called Packing Heat. Mention should be made of the excellent table created for the 28mm Chania Gate CoC game by James Morris and also the terrific 15mm table by Phil Turner and Jenny Owens for the 1940 Arras counter-attack game of IABSM.

Thanks to David Hunter for organising the event and also to Jim and Ellen at BIG for the facilities.

Friday, 19 October 2018

Dice holders for recording unit shock

Ha! The above has to be one of the most dull titles I've ever written, but sometimes there isn't really an easier way of doing things.


There really isn't a great deal to be said here, but when I was at Colours recently, I picked up some little single and double dice holder cells from Warbases, my Go To people for all things MDF, plus some 7mm D6 to fit in the holders.


I now have 15 double cell and 15 single cell bases which I will be using to record Shock in my games of CoC, Sharp Practice and IABSM.

It was a simple job to glue these in place on some 25mm round bases (also from Warbases) with PVA glue, flock the bases and then give them a spray with varnish.

I've already used them, as shown in this post. This means I can stop using the little red plastic markers for Shock and can go back to using them for marking Pinned units and other unit statuses.


Monday, 8 January 2018

Post Christmas big IABSM AAR

The club normally meets on Sunday afternoons, but over the Festive Season, we didn't meet up on either Christmas Eve or New Year's Eve. However, we did have a Thursday afternoon session on the 28th. I offered to put on and umpire a big game of I Ain't Been Shot Mum for two players a side. This would be a 1944 game, with the British forces pushing forwards into the Low Countries after the Liberation of France as part of the advance towards the Rhine.

What I wanted to do was put on a game with a lot of tanks but also have plenty of obstacles to aid the weaker side (in this case weak was relative). The field was laid out on four tables, creating a long battlefield with plenty of cover and dead ground. Here it is, seen from behind the German position.


The scenario was as follows;
After the end of the Battle of Normandy, Allied forces are pushing eastwards into the Low Countries. German resistance is stronger than expected but patchy in places. Defence in many cases depends on ad hoc formations made up from whatever troops are available to counter the advance of the Allied armour.

This scenario is one such encounter.

A British tank squadron and a company of motorised infantry have been tasked with taking a river crossing.

An ad hoc German Kampfgruppe is opposing the British advance.

 
The German force was:

1 weakened Kompanie of Panzergrenadiers (veterans)
Co HQ (with 3 Panzerschrecks) L3 BM (2 x SdKfz 251)
2 x Zugs each with L2 BM
1 section of 4 x MG42
1 improvised Rifle Kompanie (poor regulars)
HQ – 2 x tripod MG42, 2 x Panzerschrecks L2 BM L1 BM
1 rifle Zug L1 BM
1 Zug of Panzerknackers (2 x MG42 teams, 4 riflemen, 8 x Panzerfaust shooters) L2 BM

1 ad hoc Panzer Kompanie
HQ – 1 x Tiger I L3 BM (veteran crew)
1 x Panzer IVH (average crew)
Zug 1 – 3 x Panther G L2 BM (average crews)
Zug 2 – 4 x Panzer IVH L2 BM (green crews)

Anti-tank Zug
3 x Stug III (average crews)

The British force was:

1 squadron of Cromwell IV and Sherman Vc tanks (all average crews)
HQ – 3 Cromwells (1 with 95mm CS howitzer) and 1 Sherman Vc L3 BM
4 troops, each with 3 Cromwells and 1 Sherman Vc each with L2 BM

1 company of motorised infantry (the infantry are dismounted from their vehicles) all good regulars

Co HQ – 1 x 8 man rifle section L3 BM L1 BM (in a halftrack)
3 x rifle platoons each with L2 BM
1 carrier section – 4 x carriers with Vickers MMGs (can be mounted or dismounted)
1 flamethrower section (4 teams in a halftrack)

For this scenario, the following conditions were applied;
The Germans may defend in depth on both sides of the road. The Germans must defend a river crossing at their end of the table.

Some of their tanks have been recycled from battle-damaged vehicles and the German deck includes the Vehicle Breakdown chip. When this is drawn, roll 1D6 for each tank that has already been deployed (don’t roll for tanks under Blinds). Only roll once for each tank.

Any tank that rolls a 1 is broken down and will be immobilised for the rest of the game, but can continue to fire. Any shock against an immobilised vehicle will be doubled.

Any tank that rolls a 2 will suffer a failure of the turret traverse and will only be able to fire in a 90 degree forward arc.

The Panzerknacker Zug is split into two sections, each with 1 x MG42, 2 riflemen and 4 men with Panzerfausts. Once the Fausts have been fired, these troops revert to being ordinary riflemen.

The Germans have four pieces of field earthworks and one small pillbox.

The Germans can deploy hidden or under blinds, They have no dummy blinds.

The British will deploy under blinds and have two dummy blinds.

The 95mm CS howitzer fires smoke shells only, as do the 2” mortars in the British platoons.

The British are to advance along the road, which is hemmed in by trees on both sides to take the two bridges over a river defended by a German force. Only the larger bridge can support the weight of tanks, but smaller vehicles can cross both bridges. The terrain is undulating and visibility is broken up by the trees and hedges. The ground suits the defenders and is not prime tank country.

Intelligence reports that the bridges are well-defended.

I allowed the Germans to deploy up to halfway  along the length of the table, with the British being limited to a deployment zone that was one quarter of the table deep.


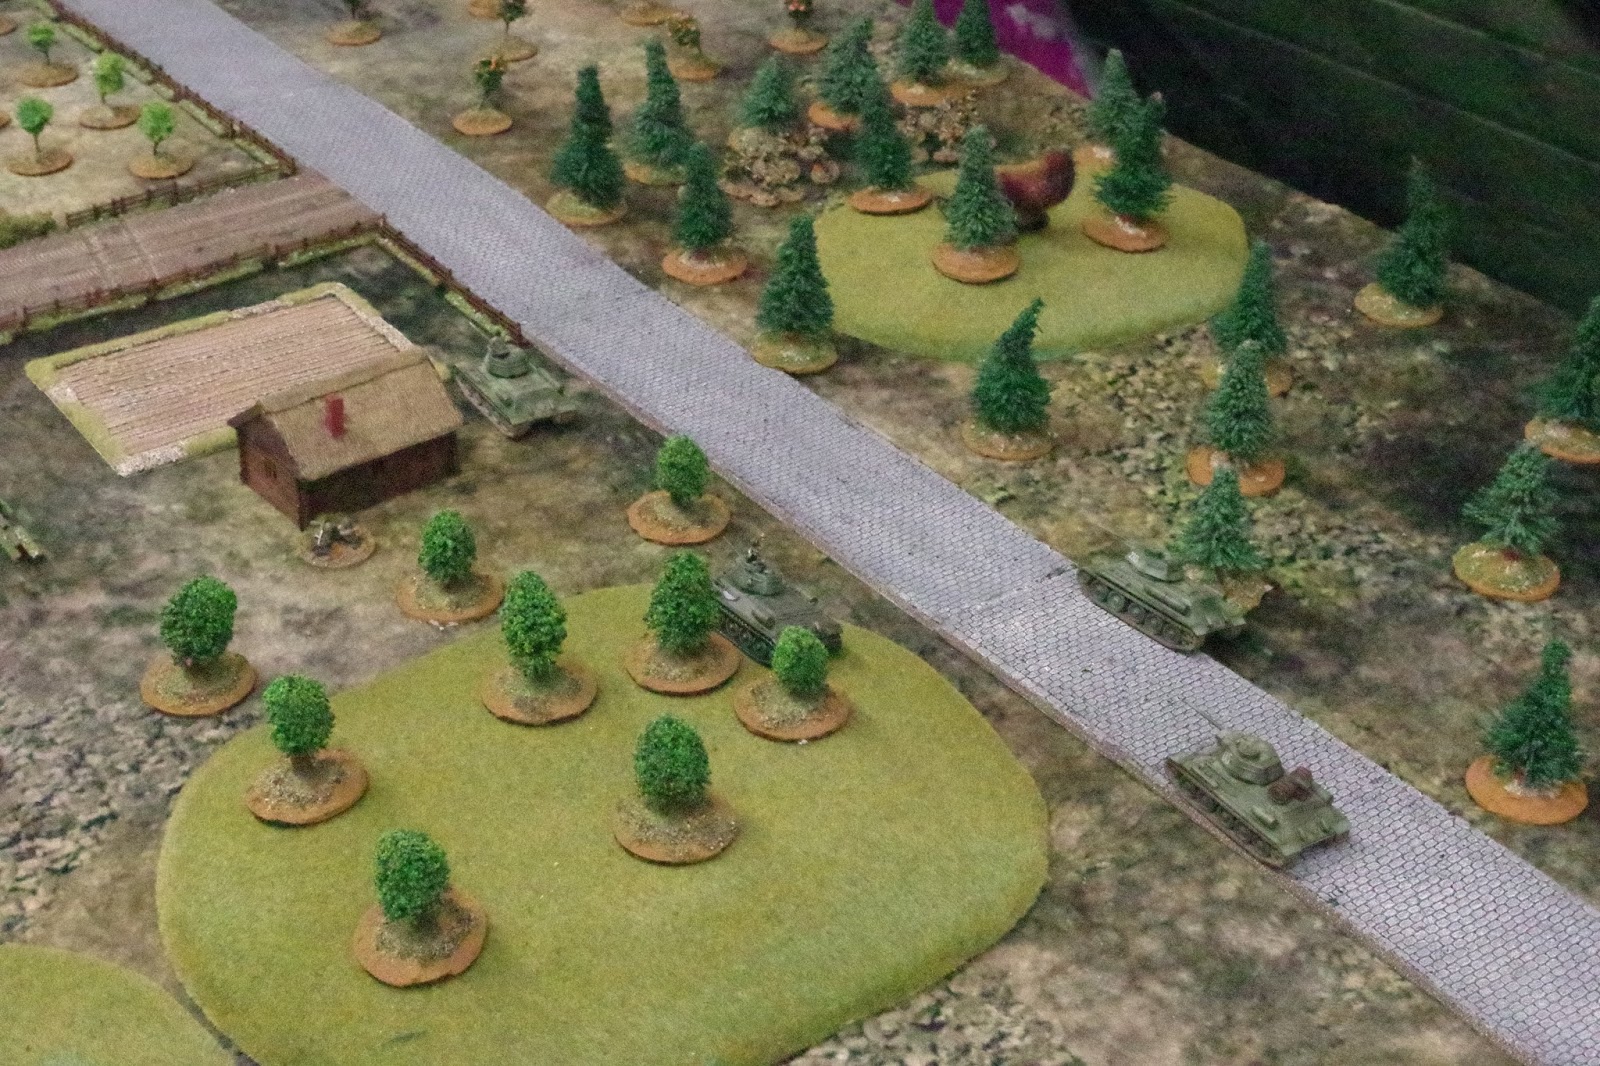
The Germans chose to deploy with everything hidden in their deployment zone. I didn't know where they had placed their units, but I assumed that the pillbox would play a role. The British deployed under blinds on both sides of the road but pretty soon they had had a number of elements spotted.


The 2" mortar of this platoon quickly started to lay down smoke to prevent the defenders from firing on them. On the British right, more tanks and infantry advanced towards a hill, spotting some German defenders, Panzerknackers and MG42 teams from the weak Landser Kompanie. These were quickly eliminated by mass machine gun fire from the tanks (well, the Cromwells actually, the Sherman Vc tanks not having hull MGs) and the Vickers-armed Carriers. The power of the machine guns was pretty much devastating.


The Germans were unwilling to show their hand at all and most of their troops remained unspotted and hidden, holding their fire and pretty much inviting the British to advance. The British managed to discover a Zug of Stug III tank destroyers behind a hedge.


Despite massed fire from the two British left flank tank troops, these Stug IIIs remained unharmed and soon caused havoc on the single Cromwell troop in front of them. The infantry platoon was also suffering from accurate fire from a tripod-mounted MG42 in an earthwork. The British advance appeared to be stalled on the right.


On the British left, the tanks were pretty much stuck in a traffic down in the unsuitable ground on this side of the road.


The platoon supporting these tanks, cleared away the German infantry screen  opposing them and started spotting more Germans. These were a tougher prospect than the Landsers - hull-down PZKfw IVs and the Tiger.


On the German left, the remaining tanks were revealed (a poor photo, unfortunately);


And the Germans also revealed a previously unseen Zug of Panzergrenadiers covering the central lake and road junction.


A different view of the German Panzerfront, a daunting sight for the British tanks.


At this point, the  clock was ticking and there was little time left to reach a conclusion. However, it didn't look too healthy from the point of view of a British tanker. Regretfully perhaps, the British commanders decided that discretion was the better part of valour. One tank troop was a set of burning wrecks and one infantry platoon had taken a lot of casualties from machine gun fire. The Germans remained in a solid defensive posture, with the only casualties being from the screen of Panzerknackers and MG42 teams.
   
So, an interesting game, the Germans playing a canny waiting game and the British being unwilling to advance too far into the unknown, even declining to use the Allied Armour Bonus chip whenever it emerged from the bag. Discussing this afterwards, the consensus was that after the attritional horrors of the Normandy campaign, the British regulars tended towards self-preservation rather than Tally Ho-style heroics. We agreed that once the location of the German tanks was known, the appeal of advancing towards those long 75mm guns (not forgetting the 88mm on the Tiger) was limited, to put it mildly, especially as they were adequately protected by those unharmed and fresh veteran Panzergrenadiers.


Monday, 25 September 2017

Breakthrough in Normandy - an IABM AAR

I played a game of IABSM at the club yesterday against a potential new member, Steve who contacted me via the IABSM Facebook group. I created a scenario based upon Scenario No. 5,  Breakthrough in the IABSM rulebook.

The British need to advance along the only road towards the village of Ste Madeleine-sur-Fleuve. To do this, the main force has sent a relatively strong mobile scouting group down the road to probe the German defences and hopefully force a breakthrough. This forces consists of two troops of tanks (each with 3 x Cromwells and 1 x Sherman Vc and L2 BM), one section of carriers equipped with Vickers MMGs (L3 BM) and two rifle platoons (one in 4 half-tracks and one carried as tank riders, L2 BM). The HQ (L3 BM, L2 BM) for this force has an attached platoon of 4 x 3” mortars carried in 4 Loyd carriers and is carried in a half-track. Each rifle platoon has one member designated as a sniper.

Chips

British Armour 1
British Armour 2
British Platoon 1
British Platoon 2
British Support 1 (MG carriers)
British Support 2 (mortars)
British Sniper
British Big Men 1-7
Armoured Bonus

There is a German defence screen ahead of the village which has been ordered to stop the British advance, to allow time for the Germans to complete their  withdrawal towards the major town of Falaise to the south.

The German force consists of two Zugs of Panzergrenadiers (each with L2 BM), supported by 2 SdKfz 251 Stummel half-tracks with short 75mm howitzers (L2 BM) and two Marder III Ausf. M with 75mm Pak 40 a/t guns (L2BM) and a Zug of 3 x Panther tanks (L2 BM). The HQ  (L3 BM) for this force has a section of 3 x Panzerschrecks and 2 x MG42 teams. The Germans are dug-in behind some hastily-built field defences.

Chips

German Armour 1
German Platoon 1
German Platoon 2
German Anti-tank 1 (Marder IIIs)
German Support 1 (short 75mm halftracks)
German Support 2 (Panzerschrecks)
German Support 3 (separate MG42s)
German Big Men 1-6

Note that neither side has a chip for the HQ. This is because any HQ-attached elements have their own chips. In addition to the Tea Break chip, the bag contains two blank chips which act as a countdown. Once the blank has been drawn 12 times, the game ends.

We rolled a D6 to see who would be the British and who would be the Germans. I rolled higher and chose to play as the German commander.

The terrain is relatively flat with some hedges breaking up the ground, a couple of lines of bocage (marking the German deployment area) and a small wooded area from which the British troops will emerge. There is a small reservoir by the road and a walled potager at the German end of the table. The ploughed fields on the side of the road are designated as soft going (-1" on each movement dice). The temporary German field defences can be seen to the left of the reservoir and the right of the road.


The British advanced under blinds but two units were soon spotted by the defenders. These were one of the tank troops and the carriers armed with Vickers MMGs. These could fire on the move.


Most of the German defenders were hidden in the deployment area but there were a few units under blinds. One was spotted by the carriers and was exposed as a pair of Marders.


The British tanks opened fire, and one Marder was immediately knocked out by the troop Sherman Vc with the 17-pdr gun.


The second Marder would soon follow, leaving the road almost open for the British to drive hell-for-leather towards Ste Madeleine-sur-Fleuve


The Germans began to emerge from under their blinds, with the main threat being the weakened Zug of three Panthers.


The Panthers were soon in action and two Cromwells were hit, causing them to brew up. One was the tank with the troop commander.


One Panther was knocked out by the Sherman Vc in the tank troop as the 2" mortar with the platoon which had been riding on the tanks laying down smoke to obscure the British advance.


Realising the the British intended to use speed to get past the German defences, which had been across the table in the bocage, the first Panzergrenadier Zug began to advance across the open ground, secure in the knowledge that the British infantry in the ploughed field were pinned by 75mm howitzer fire from the Stummels. Elsewhere, the Panzerschrecks had destroyed two of the carriers, and damaged a third as the British continued their thrust along the road. There were two British units still under blinds. The Armour Bonus chip was helping the British move quickly.


The  rear tank troop engaged with the Panthers at short range, but without any luck. The Germans were more accurate and the remaining two British tanks were soon taken out by the long 75mm guns on the Panthers.


The Panzergrenadiers advanced on the British platoon pinned in the field and wiped them out. A Panzerfaust managed to damage one of the Cromwells in the other troop but couldn't prevent the Rifle platoon in the half-tracks (under a blind), the remaining two carriers and the tank troop from getting off the table, with the Panzerfaust and MG42 teams being wiped out by Vickers fire. However, the victory conditions were that four units with at least 50% of their original strength remaining should exit the table and this was no longer possible, so this game ended up as a victory for the German defenders.

This was an interesting game, not least because I had expected the British to advance on a wide front and deployed my two infantry Zugs in a line across the table. Steve, however had other ideas and went for a mad dash along the road. The only unit held back was the mortar platoon, who stayed unused under a blind at the back of the table. Steve was never able to use the firepower of the 3" mortars to suppress the German defence. 

What really mattered here was whose firepower was best and it turned out that the three Panthers were more than a match for the British tanks, excepting the destructive power of the 17-pdrs on the Shermans.

A couple of notes about the way I planned the scenario. 

First, I rolled a dice to see who would be attacking and who would defend. 1,2 or 3 was a German defence and 4,5 or 6 was a British defence. I rolled a 2, so the Germans were the defenders.

Then, I used a dice to select which tanks would be available for the Germans.

1-3 Panzer IV
4-5 Panther
6 Tiger I

Then I rolled again to see how strong the Zug would be. A full-strength Zug is five vehicles. The roll would be as follows;

1 or 2 - full strength
3 or 4 - one vehicle under strength
5 or 6 - two vehicles under strength

I then rolled a D6 to see if the anti-tank unit would be Stug IIIs, Marders or Pak 40-equipped SdKfz 251 half-tracks. I'd already decided that only two would be available. Clearly, Stugs would be the best choice here, but it wasn't to be.