Friday 30 March 2018

The Late Romans are finished ...........

............. well, the first tranche of my Gripping Beast Romans are finished. There are plenty more left to work on, but these will be the core of my Late Roman Saga warband. They will also work for a post-Roman British warband too, and I am going to continue to add to the force over time to give me a Late Roman army for Sword & Spear, as I've already mentioned. 

Anyway, when I was thinking about a colour scheme for these, I knew that the last thing I wanted was a boring bunch of figures all wearing exactly the same colours. However, I did want to have something that tied them together so that they didn't end up looking like a random bunch of models. People often seem to have funny ideas about how the Roman Army looked, generally based upon what they have seen on the cinema screen or on TV. One of the big misunderstandings is the idea that there was a standardised "Roman uniform", because there wasn't, and that particularly applies to the period of these figures. Another misconception is that "the Romans always wore red tunics", because that is also an invention of the film industry.

So, on to the pictures, with some comments about the colours I've chosen. First, here is a group of eight archers, representing a bow-armed Pedites (Warrior) group for Saga. These are all wearing tunics, but I've chosen to paint those tunics in a variety of "natural" shades, representing unbleached or undyed wool or linen. To create a degree of unity, I've painted the trim on the tunics in a range of shades based upon Vallejo Blue Violet. You'll note also that they aren't all wearing the same colour breeches.


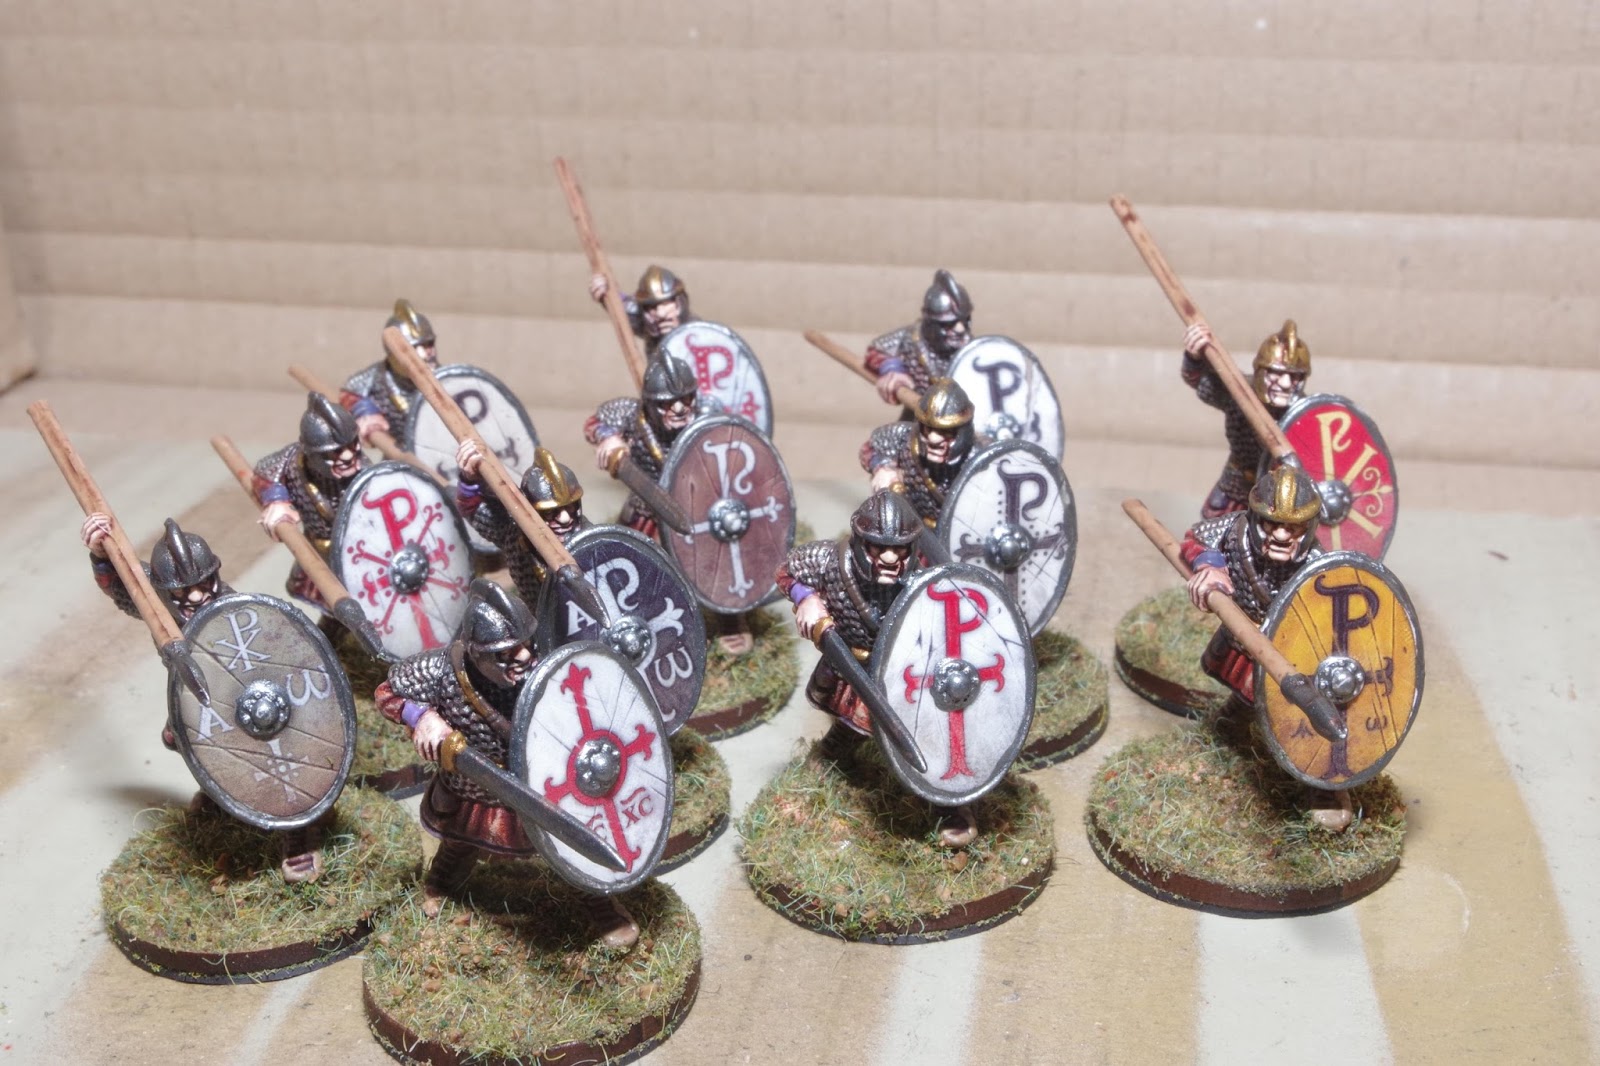
Next, here are a dozen armoured infantry. These were given reddish tunics, based upon Vallejo Burnt Red, but in a variety of blended tones. Their tunic trims are also based around tones derived from Blue Violet and Oxford Blue. The shields all feature LBMS Late Roman transfers. These figures are going to represent the Hearthguard (Equites in Arthur and Aetius) elements in my warband.


Here are some characters; a commander, who will be my band's Warlord, accompanied by a buccinator with the distinctive Roman horn, the cornu or buccina, a signifer (standard bearer) with a draco standard and a second command figure,  who will serve as a Hero if required.


Next,  a group of eight more Pedites. These are unarmoured, with the same idea behind their tunic colours as for the archers. Note that these troops' tunics have red trims, to link to their red shields.


Now, let's look at those Hearthguards again. I decided to make three distinct groups of four, one with swords, one with couched spears and the third with their spears held overarm. I think that this was important, because the one issue with plastic figures is the basic similarity in the poses. I wanted to create as much variation as possible, which is why they aren't all wearing the same helmets. I also wanted to give these chaps a variety of shield designs, so that when they are being used as post-Roman "Arthurians" they look more like individuals rather than just recruits to a standing army.

Of course, I could also use these troops for Dux Britanniarum, which is something that I am still keeping in mind for later.


So, that is the core of the warband finished. My final piece of the jigsaw is a group of 12 Tirones, or Levies armed with javelins. More on them in a later post. I also want to make up a dozen Levies with slings for when I am using these as post-Roman British.

Then, of course, there must be some mounted troops, and I have lots of ideas about how they are going to look. I just need to narrow that down a bit.

Wednesday 28 March 2018

Late Romans WIP

I don't usually post any WIP pictures, but these Romans are such a lengthy and complex project that I thought it would be worth showing how far I've got with them.
               
I'm not going to say too much about what is there, because I will leave that for the finished figures, but they have been quite interesting to paint. I've not done any 28mm plastics for ages, and I'd forgotten that they always look a bit crude until the shading, dry-brushing and inking stages are over. Now that I've inked them (using Windsor & Newton Peat Brown drawing ink) I think that they are coming together nicely.


Apart from on my two original test figures, I've undercoated the shields separately, white on the outer side and brown on the inner.


I've also made up 12 Dark Age Warriors as javelin-armed Levies, and made up the four command figures from my second box of Roman Infantry to offer up a bit of variation to my Roman units, two as armoured swordsmen, one unarmoured swordsman and a vexilla bearer. I have undercoated these in brown because I am thinking of painting these levies up in fairly rustic dress, using a pretty restrained palette. For the four Romans, it doesn't really matter what colour they are undercoated, because they will end up looking very different once finished.


The reason I've done the shields separately in white is so I can apply these rather lovely shield transfers from Little Big Men Studios before I glue them onto the troops. The range of different designs is pretty wonderful, and I intend to use a few different patterns over the course of the project, not least on the recently announced Late Roman plastic cavalry from Gripping Beast. I also understand, because I emailed GB and asked about it, that later this year there will be some unarmoured plastic Roman cavalry too, with the option of making some horse archers. That please me greatly.


Now that I've broken the back of the work, I can start thinking about the Dark Age cavalry and how I want to use the rest of the foot figures still on their sprues.

Wednesday 21 March 2018

When two patrols clash - a Sharp Practice imagi-nations AAR

Here is a game I played at the club last Sunday.

The scenario was an encounter between a Syldavian patrol and one from Borduria in the border region between the two countries to the north of the Zympathian Mountains, where the foothills flatten out to form the Great Bordurian Plain, known as the Pjinfold in the local dialect.

The Syldavians were pushing northwards to see how many Bordurian troops were in the region, in advance of an incursion by a force comprising several brigades.

The Syldavian force was a small column of Fusiliers and Grenadiers from the Splitz Regiment, supported by Jägers. The patrol was accompanied by an ammunition wagon.

Opposing them was a hurriedly-assembled force from the Freikorps Schtroumpf, supported by some Bordurian Fusiliers and local Hajduks, or border troops, also with an ammunition wagon.

The terrain was lightly-wooded with a number of rocky outcrops and a few fields of cereal crops. The Syldavians were on slightly higher ground.


The Syldavian commander, Kapitän Heinrich Chzippz led his troops towards the low ridge that dominated the centre ground.


They were opposed by a line of infantry from the Freikorps Schtroumpf, led by Kapetánios Ioannes Doukas, the youngest son of a local Bordurian landowner, supported by fusiliers from the Krupski Regiment.


Elsewhere, Syldavian  Jägers were opposed by their opposite numbers from the Smederevka Hajduk regiment.


Both forces were soon engaged in a musketry exchange, with both sides taking shock.


Further exchanges of fire saw the Syldavian Grenadiers taking a lot of casualties, which soon led to them breaking and fleeing the scene. The relatively early loss of one group of Jägers, who were acting as a skirmish screen didn't help matters either.


Both sides were soon blazing away, with accurate shooting from both sets of skirmishers taking a toll on the lines of troops.


Before long, a crashing volley caused one group of the Freikorps Schtroumpf to flee.


Eventually, the rest of the Syldavian fusiliers joined the fire fight, causing casualties and shock. Unfortunately for the hapless  Kapitän Chzippz, his forces were getting the worst of the encounter, with his force moral falling steadily.


Accurate musketry from the Bordurian Hajduks and skirmishers were  whittling away at the Syldavian line, and shock was making the Syldavian return fire less effective.


The Bordurians were dismayed to see a random event  force a group of infantry charge forwards, only to be wiped out by the staunch Syldavian defenders on the ridge. However, this was a false dawn for the Syldavians, who were being forced to withdraw back whence they had arrived, leaving the Bordurians in possession of the field of honour.


This was an exciting game, with Brian, commanding the Bordurians the eventual victor. Once again, the martial prowess of the Bordurian Autokrator's military machine proved too much for the Syldavians, who never really recovered from the loss of their elite Grenadiers. 

One thing this game really showed perfectly is how effective the Sharp Practice rules can be with regards to shock. The Crashing Volley rule, which inflicts double shock, can be devastating and can force groups of troops to break once they are taking casualties.

However, as things turned out, it really was a case of Goodbye, Mr Chzippz.


Monday 19 March 2018

Downend Folk House Craft Fair

Last Saturday was the annual Downend Folk House Craft Fair, held at Lincombe Barn, where our wargames club also meets. This year, the club was invited to take a table at the craft fair to show off what we do each Sunday afternoon. 

So, four of us, Nick, Craig, Clive and myself turned out and staffed our display, which included figures and rule books, plus a demonstration game of Sword and Spear, using Clive's Crusader and Saracen 28mm armies. Here is what we put on display. We had a mixture of 10, 15 and 28mm figures, some 15mm vehicles and a number of different sets of rules. We also had some unpainted metal figures and some sprues of plastic ones, so that people could see what the raw materials look like before we get to work with sprays and brushes.


Then, there was the game. This was a hugely enjoyable experience, mainly because it was fun, and, let's face it, if gaming isn't fun, why do it in the first place?

Anyway, Craig and I were the Saracen generals, opposing the Frankish infidels led by Clive and Nick. I took the Saracen right, with most of the heavy cavalry and light  horse archers and Craig had all the foot, some camelry and the rest of the mounted troops. The plan was for the Saracen left and centre to hold the line while my cavalry swept across the table to roll up the Crusader line and capture the main prize, the One True Cross (or a decent replacement from the Acme True Cross Company) in the centre of the Frankish line.

Unhappily, my screen of horse archers was soon whittled away and the victory points were mounting for Clive and Nick. Elsewhere, the power of the Frankish knights became apparent as they charged into combat, sweeping all before them, at least until Craig's camelry and armoured foot managed to turn the tide.

In the centre, the generally not very good infantry of both sides clashed around the ruins of what were presumably the remains of some antique city from the classical past. Finally, my heavy cavalry gained the upper hand, with only one unit if armoured infantry standing between me and the Frankish camp and True Cross. Also, a gap had opened up in the centre, giving another possible path to victory. Most of the best Crusader units had been destroyed, so things were looking up, except that our army was heading towards Break Point, due to the loss of so many poor units. All that we needed to do was hang on, clear the way and the prize would be ours, except ....................... the Saracens lost another unit of rubbish foot, which took us past Break Point, leaving the battered and sorely depleted Crusader army victorious.


Thursday 15 March 2018

My current project - Later Imperial Romans for Saga

This project has come as something to do while I am waiting to get my Bad Squiddo Freyja's Wrath Swordmaidens once they start shipping around the end of April.

I've always wanted an excuse to paint up some Late Romans, because the Roman Empire of Late Antiquity and the early mediaeval period has long been a major interest of mine. A while ago, I bought some Gripping Beast plastic Romans and Dark Age cavalry and more recently. I bought the Aetius and Arthur Saga handbook to go with the Saga 2 rules and the Age of Vikings handbook.

So, with my new knowledge of what is required, I've started out on a new plastic mountain. In addition to the plastics I'd already bought, I bought some more Romans and Dark Age cavalry, plus a box of the Gripping Beast Dark Age warriors. I bought the latter mainly so that I could make up 12 slingers and 12 javelinmen to give me some Levy variants for both the Romans and the post-Roman British. Of course, I'll also be able to make up a load of generic spearmen too, which I'm sure will come in useful.

Now, I know that this will give me far more figures than I'll ever need for Saga, but I am looking at the bigger picture too. I reckon that I'll be able to put together a Late Roman or Romano-British (or generic Romano-Germanic) army for Sword and Spear as well. I just need to carry on buying odds and ends to give me lots of choices. I've already got my eye on the plastic Saxon Thegns and Dark Age archers too, as they will definitely bulk out any 5th-6th century Roman force.

Now, I am just hoping that Gripping Beast are planning some plastic Roman armoured cavalry too!

Anyway, I've just started work, and I'm taking it slowly. So far, I've begun to work on the two command sprues in the Roman box and I've assembled and undercoated eight archers. Once I've got those finished, there will be pictures.

Wednesday 7 March 2018

A new AAR for Alien Squad Leader - an interesting encounter.

This was a pretty unusual game played between myself and Alex Self (the author of the ASQL rules)  at the club last Sunday. It was mostly unusual because the scenario we ended up playing (Scenario 2: Meeting Engagement) suited neither side, because both had opening options that were negated by the conditions of the scenario, because both sides were off table to begin the game.

The army I chose was my recently-completed Human Imperial Strikeforce while Alex had gone for a 2nd Global War German Occultists force. His army would be considerably larger than mine and would also outnumber me in numbers of vehicles and heavy weapons. My hope was that my power armour 5+ save would help me survive the inevitable bombardment while the inherent unreliability of his vehicles would let him down. I was nominally the attacker, but I didn't want to charge into massed heavy weapons fire.

My Strikeforce represented a fast attack unit from the Third Human Condominium which had been sent to investigate an unknown enemy which had emerged on the planet of Thekla III from some kind of wormhole or tear in the fabric of the space-time continuum. 

The battlefield didn't seem to offer me many possibilities, but I was able to move two pieces of terrain before the start, allowing me to move the village and the palm tree grove to my side of the table. The two hilly areas with rocky outcrops on top were impassable terrain features.


My deployment point was right behind the village.


Alex's Occult Nazis deployed from behind this are of soft cover.


The 3HC commander got into the village early, bringing a unit of Shocktroopers with him.


The only troops who had been able to take advantage of the Strikeforce's Sudden Strike rule were two stands of jetbikes.


I began to push troops forwards to occupy the palm grove and sent my APCs forward. These were equipped with turret-mounted heavy weapons and each carried a stand of Shocktroopers and another of Assault Troops, equipped with power axes in addition to their normal weapons.


The evil Nazi hordes poured out from their wormhole. They had slow-moving experimental tanks and a lot of infantry.


By now, I was wishing that I'd moved the palm grove closer to my side of the table, to the right of the village. This would have given me a much better position.


I started to push forward on my right, to try and close off the gap between the two areas of impassible terrain.


Meanwhile, I occupied the palm grove. There was a Medic with these units. His presence would be crucial.


Already, one of my APCs had sustained damage from some incredibly accurate fire from the German tanks. Alex was rolling some amazing dice, lots of doubles causing two critical hits. With only one saving roll available to me, damage was inevitable. I'd have to get the troops out of this APC pronto!


Things were not going any better for the other APC. I swiftly deployed the two stands (Assault Troops with green helmets).


Accurate fire from the German Crewed Weapons inflicted damage on my troops. I moved the Medic to help them. Unfortunately, they are wiped out before he is able to help.


The troops disembark behind a hill.


The Medic is certainly earning his pay today, as wounds are getting removed almost as quickly as they are being caused. Note that the Medic has taken a hit. That happened when I lost the Shocktrooper stand which he was trying to heal.


Horrifying Zombies shamble forwards, animated by some foul Occult Powers which the Germans have discovered. I send my Assault Troops forwards. Despite causing damage to the German tank. they are eventually pushed back, taking a wound too.


The palm grove is right at the core of my army. I push Heavy Weapons forwards to try and knock out the German long-range capability. They are successful and both stands of Crewed Weapons are destroyed. The Heavy Weapons also inflict damage to one of the German tanks, which spends the rest of the battle staying out of range, effectively neutralised.


The Assault Troops take on the Zombies. There can only be one winner here.

My Shocktroopers pour massive fire onto the Zombies, thinning their ranks. Is it all too little,too late, though? At least the Assault Troops are in cover now, receiving medical assistance.


Meanwhile, over on my right the jetbikes, supported by fire from the Shocktroopers and the damaged APC try and stop the Nazi advance. This fight will continue to rage on until my APC is destroyed and I bring all the units back to the village and palm grove.


Finally, time runs out. It is clear that from a shaky start, I have managed to stabilise things. My Medic is removing wounds with regularity now and my troops are inflicting damage on Alex's Germans. Totting up the points, I have caused more damage than I have received, but the result is a draw. However, we agree that it seems likely that if we were able to continue, the 3HC Strikeforce would have the upper hand.

So, a really absorbing and exciting game. Two very different armies, but both hamstrung by the scenario. I am not sure that this scenario really suits the Imperial Strikeforce at all, but that is all part of the challenge. One needs to make the most of the army, regardless of the situation in which they find themselves.