Monday, 10 June 2019

My Saga: Age of Magic Otherworld warband is complete.

As mentioned in an earlier post, here I decided that most of my Warriors would be made from the North Star plastic Frostgrave Cultists box set. Well, I finally finished them off over the weekend just gone, and here they are;


As you can see, there are two groups of eight, all wearing a red/purple/lavender theme, with hooded faces. They are not all equipped the same, some have spears, others swords, axes and clubs. Some are carrying shields. Most of the shields are from the Cultist box, but there are also a couple of oblong shields from the Ghost Archipelago Snake Men set and also one or two small targets from the Perry plastic late mediaeval European Mercenaries box. I wanted these guys to have an almost uniform appearance but also have a degree of individuality, and I think that I have succeeded in this aim.

So, now they will have to make an appearance on the tabletop, and their first outing will be this coming Sunday at the club.

Monday, 3 June 2019

Another Sword and Spear Fantasy rules AAR

Well, there will be pictures and a few comments about the battle, but really I want to muse on the subject of using the rules to create killer armies and whether this is a Good Thing or not.


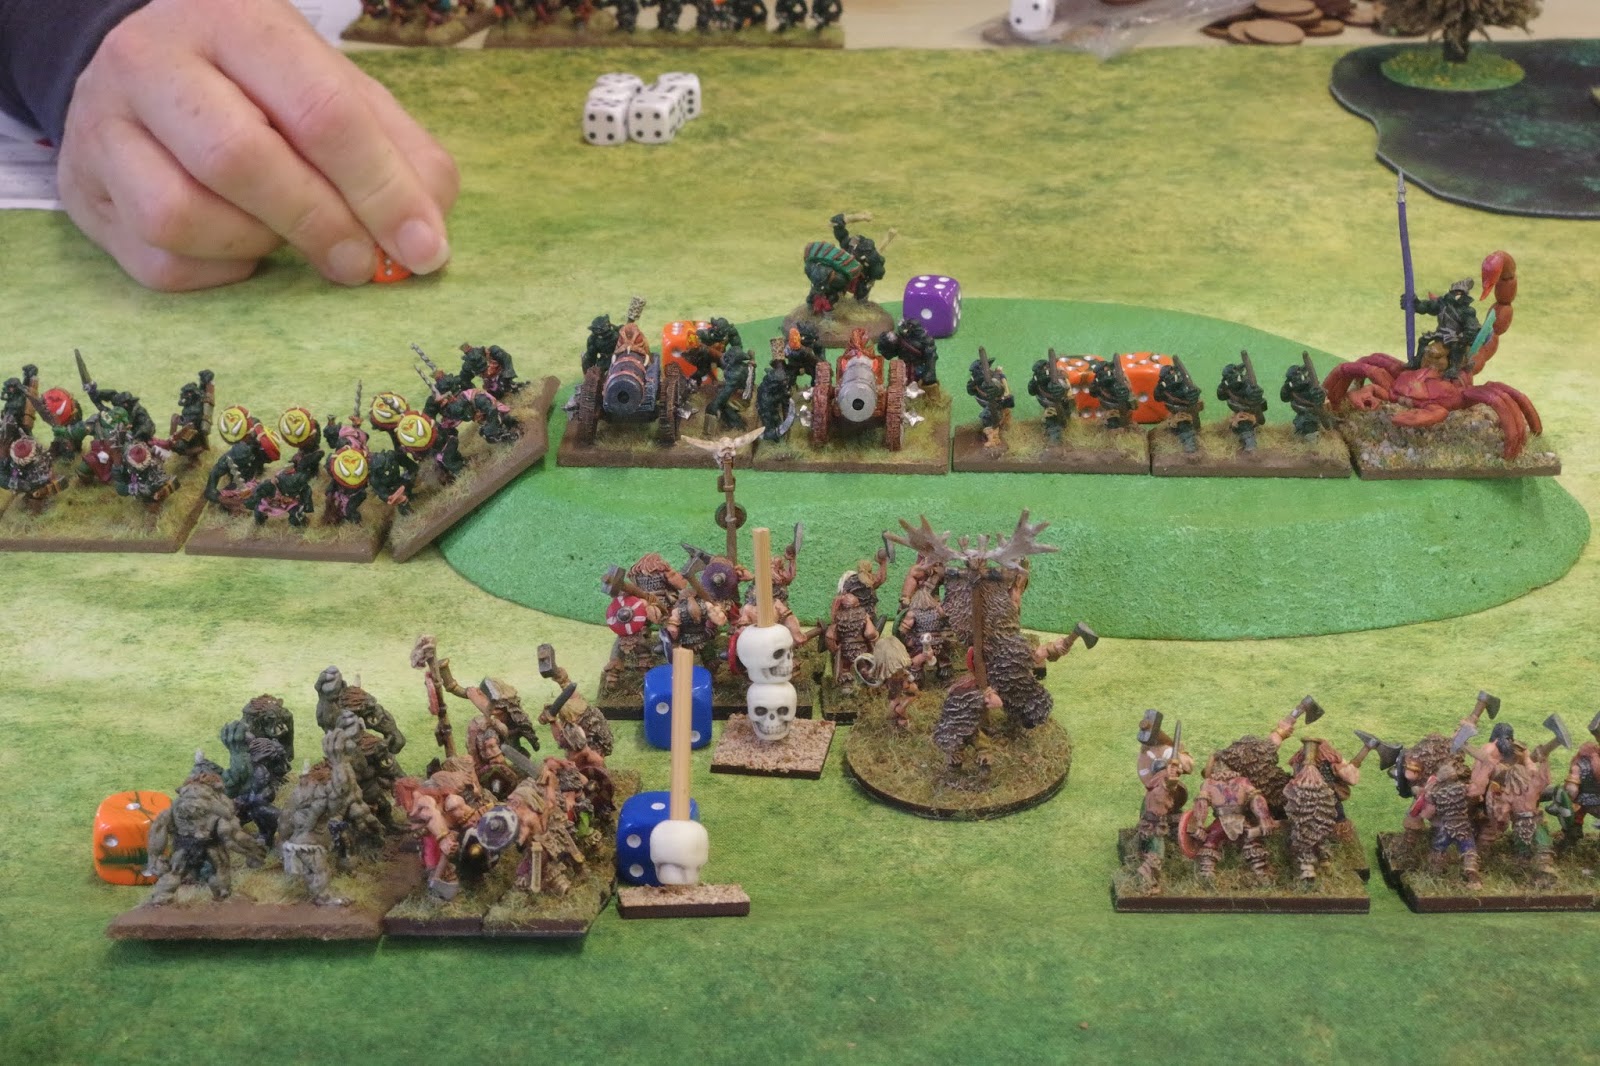
The battle was between my Hyborian Barbarian horde and Nick's Orcs, augmented by some Meerkats who clearly didn't fancy a career in selling insurance products. Both sides were pretty equally matched in numerical terms.


I decided to put all my heavy foot units on my centre-left and place my cavalry out on my right.


Nick had a lot of medium foot, some heavy foot and a lot of shooty types, including Orc cannon.


Unhappily, his cannon were directly opposite my shieldwall of heavy foot, supported by longbows. My elite foot were soon getting shot at. The problem with Heavy Foot in S&SF is that they are slow moving and pretty much useless until they get into combat, assuming that they don't get killed off by ranged attacks.


I had skirmishers out on my left. I had no great expectations from them, they were just there to slow things down a bit.


My cavalry on the right were there with one aim, sweeping through all the defenders and then trying to roll up Nick's line. After all, they aren't much use for anything else.


My skirmishing bows were typically hopeless at turning Orcs into pin cushions. I sent a pack of wolves into combat and some light horse with javelins. Neither lasted very long.


My heavy foot plodded across the gap to try and assault the Orc cannon battery.


Elsewhere, I got my Giant and a Hero into action. The Giant huffed and puffed, and was then swiftly vanquished. The Hero held on for a bit longer, but soon joined the tribal ancestors, feasting with the Gods of Battle .


Progress was slow. My activation dice rolls weren't helping. Most of my barbarians are Discipline 4, so I have to consistently roll high numbers to do anything.


My cavalry had some success, seeing off some annoying bow-armed Orcs, but my line was disrupted by some stupid manoeuvres on my part.


The long, slow march of the Hyborian heavy foot was nearly over and they would soon be wielding their axes and war hammers against the Orcish artillery.


Because of my hopeless handling of my cavalry, I ended up with my right flank exposed to attack. I hastily reorganised things.


A unit of Trolls assaulted my heavy foot Luckily, I had been able to get them to face their attack and not get hit in the flank.


Finally, my heavy foot were fighting, and making short work of those guns. Hurrah, a success at last. My second shieldwall unit was ready to charge the archers. Surely, this would be a mere formality?


My lonely cavalry unit was unable to do anything, being marooned in a forest, which negated all their advantages.


The titanic struggle for the hill would decide the battle. Unfortunately, my barbarians were obviously a bit puffed out from all the walking they had had to do to get there and were making hard work of actually fighting.


Before long, the Trolls and Orc cavalry were around behind my shieldwall. Not a good thing.


My cave-dweller foot were fighting for their lives against the Meerkat cavalry. I have no idea what those longbowmen were going to do.


This was where we called time. I had lost a lot of troops and simply couldn't win. 

So, this is where I start musing. Nick made the sensible observation that my army is too difficult to control, because the units have mostly poor discipline or are undrilled, so that their heavy-hitting impact abilities are wasted because they are tricky to get into combat positions where they have the advantage. I agree with this, but it seems to me that apart from the well-drilled Shieldwall veteran foot, barbarians should be hard to control. That is why they hang around in hordes, pillaging stuff and feasting to the sound of the lamentations of the women of their enemies, instead of building cities and holding symposiums on subjects like "Is pillaging a dying art and would reviving it be a backwards step?".

It seems to me that making more of the units Discipline 3 and removing the Undrilled attribute wherever possible is inherently antithetical to the whole Barbarian Horde way of doing things. I could try and create a killer army, smaller and more expensive, but with biddable units of well-drilled and obedient soldiers, but that would mean that they were no longer barbarians., so, on balance, I much prefer them to charge off impetuously and hope that the War Gods are with them rather than employing those sneaky civilised ideas of strategy, tactics and obeying orders. Yes, the worse the discipline, the harder it is to remove the effects of broken morale, but that is surely part and parcel of being a barbarian? Winning and smiting is great, but when the going gets tough, the horde melts away. That is, after all, why smart barbarian warlords fairly soon tend to look for alternate employment as generals and mercenary commanders in civilised armies (where, of course there is always the possibility of mounting a successful coup d'etat and replacing the incumbent ruler).

I do think, though, that my army needs more than three commanders, so next time, there will be an additional captain on the field of glory.


Saturday, 1 June 2019

Bad Squiddo Dwarves and Amazons

Annie Norman at Bad Squiddo has a new Kickstarter running at the moment. There are two separate sets of figures, Dwarves and Amazons.


People who follow this blog will probably remember that sample Dwarf figure that I painted up recently, and the rest of the Dwarves are similarly excellent figures. There are a number of really useful models available; A Captain, a Thief, two Champions, two Berserkers, a Wizard, a Bard, a Rogue, a Monk and a Ranger, which pretty much covers all the bases for a band of Dwarvish adventurers for a wide variety of fantasy rule sets.


The Amazons set is similarly varied, featuring a Captain with two Bodyguards, two Elite Guards, an Assassin, a Musician, an Archer, a Spearguard, a Champion (accompanied by a guinea pig sprite) and two "little wolves", who are two Amazon girls.

As with all Kickstarters, there is a range of pledges, up to a huge one which gives you two sets of both ranges, plus all the stretch goals.


You can also buy into bundles of existing figures from the Bad Squiddo collection, including some excellent resin scenic items, many of which were formerly part of the Ristul range.

Wednesday, 29 May 2019

A standard bearer for my Papal Condotta

A while ago, a wargaming friend of mine, Joe McGinn got in touch to say that a friend of his at the Hailsham wargaming club, who makes flags was offering to make me a flag to use with my Italian Renaissance condottieri forces. Well, what could I say, apart from a very firm "Yes please!"?

As it turned out, Mike (for that is his name) actually made me not one but two flags, and linen ones at that! One is a cavalry standard and the other one for foot troops.

I've had the flags for a while now but I've finally got around to getting a small vignette made and painted for the foot standard, and here it is;

First, from the right, showing the detail. The arms are those of Pope Alexander VI, otherwise known as Rodrigo de Borja (Rodrigo Borgia in Italian);


Now, from the left;


And finally, a frontal view;


The Borgia Papacy lasted from August 1495 until August 1503. Rodrigo was born in Valencia, in what is now Spain and his birth name was Roderic Llançol i de Borja in the Valencian language, which is related to Catalan and is one of the Romance languages descended from spoken Vulgar Latin.

Rodrigo Borgia studied in Bologna as a young man and, after the appointment of his uncle as Pope Callixtus III in 1456, Rogdrigo entered the Church. Aged 25, he was was ordained as a Deacon and created a Cardinal-Deacon. From then on he rose steadily through the ranks, eventually becoming Pope. His Papacy is notorious for nepotism, scandals, vice and debauchery, but we need to remember that this was Renaissance Italy, and Papal excesses were hardly a new thing. The Borgia were just more open about it, as well as being hugely successful. 

Cesare was Rodrigo Borgia's second son with his mistress Vannozza dei Cattanei and was originally destined for a life in the Church, being ordained as a cardinal but became a soldier and politician on the death of his elder brother. He was granted the title Duke of Valentinois by the French King Louis XII in 1498 and spent much of his life fighting to create a Borgia "state" in central Italy. He fought as a condottiero for Louis XII.

The vignette comprises two Perry plastic 28mm figures, one wearing Papal livery as the standard bearer and the other as a man-at-arms on foot in full armour, protecting the standard. I decided to put the standard bearer on a small mound, to give him more prominence on the field of battle

Friday, 24 May 2019

Female characters for Frostgrave

In between painting my new Saga: Age of magic warband, I have also been working on the North Star female characters for Frostgrave. I bought these last year as part of the massive Maze of Malcor Nickstarter (via Bad Squiddo), and I will be using them as upgrades to my current Frostgrave warband as existing troops get killed off or I can afford to replace them with stronger members. There are eight new models in total; an Apothecary, a Thief, a Barbarian, a Knight, a Templar, a Markswoman, a Tracker and a Warhound.

So, these are all now finished and here they are.

First the Apothecary and the Thief;


Next, the Barbarian, Knight and Templar;


I have tried to give the Knight a shield with a magical sigil as its device, a kind of irregular-shaped flaming multi-pointed star. I think that it works OK. Also, I have tried to make the Templar look a bit like a female version of Marvel's Thor with her red cloak and blonde hair.


And finally, the Markswoman, Warhound and Tracker. I really like the armour on the hound.


These are lovely figures, sculpted, I believe by Mark Copplestone. They have lots of personality and nice details. The castings are really crisp and paint up really nicely. I am very happy with how they have turned out.

Thursday, 23 May 2019

The saga AoM Otherworld band grows

Having completed all the big hitters and large models for my Saga Age of Magic warband, I am now getting on with the rank and file troops.

I want to keep a daemonic feel to this part of the force, so both the Hearthguard and one group of Warriors (upgraded to Hunters) will be non-human and will keep to the red/purple/bronze/brass colour scheme. The models I am using are the plastic Frostgrave: Ghost Archipelago Snake Men by North Star. This box gives you the opportunity to make 20 figures, and as I have made up six Hearthguard and eight Hunters, I have six left to use later, when an opportunity presents itself.

First, here are the Hearthguard, who I have equipped with Heavy Weapons;


Yes, I know one has a spear and shield, rather than a two-handed weapon but that is just for a bit of variety. It is a heavy spear, OK? Here they are from the other side;


Next, here are the Hunters, who cannot have heavy weapons. I have therefore given them a variety of swords, small axes and other blades. Here they are as the full group of eight.


And below, as two groups of four;


It isn't particularly easy to see the difference between the two types, apart from the difference in weaponry, but the Hunters are actually slightly lighter in colour, being painted over a Skeleton Bone undercoat, with the Hearthguards undercoated in black. I used a variety of Windsor and Newton inks here as glazes and washes, to try and bring out colour differences.

I think that these creatures really fit my overall theme nicely and definitely look like the denizens of a different plane of existence, bred for battle by daemonic sorcerors in the service of daemon warlords.

So, the warband is getting closer to completion. All I have to do now is get working on two more groups of eight Warriors, who will be humans, members of a daemon-worshipping cult. These will also be made up from North Star plastics, this time using the Frostgrave Cultist box. That will be a job for next week, I think.


Monday, 20 May 2019

Blow the Bridge - another game using this scenario for CoC

I wrote a scenario for Coc last year called Blow the Bridge. I wasn't completely happy with the scenario as written, so I tweaked it a bit to try and rebalance the odds.

Here is the scenario;
It is 1944, the Allies have broken out of France and are advancing towards Germany. The British are advancing across the relatively flat and open countryside of the Netherlands. A reconnaissance group  has been sent in front of a tank squadron to probe the German defences along a canal which is an obstacle to any further advance. Their objective is to capture a bridge over the canal, which will allow armoured units to cross and outflank the main German defensive line.

The British force consists of;

1 rifle platoon (HQ plus three sections)
1 recce section (3 Universal carriers, 1 with a PIAT team and a junior leader and 2 with Bren teams)
1 Cromwell Mk IV tank with a 75mm gun (this will only deploy on the 4th British phase, representing the advance guard of an armoured squadron)

The defending German force is;

1 standard rifle Zug (HQ plus three sections)
1 tripod-mounted MG42

1 4-man engineer section, carried in a half-track without weapons. Their role is to plant charges, not fight. If fired upon, they count as being in light cover. They will initially deploy from the table edge as a team without a leader and once deployed can only be activated by the German senior leader or on a command dice rolling a 1.

The Germans also have two lengths of barbed wire and two small prepared defensive earthworks. These will be placed after the Patrol Phase.

 The Germans can also call on support from a single SdKfz 250/9 with a 2cm auto cannon and a co-axial MG34 in an open turret. This can only be deployed by using a CoC dice and will enter from the German table edge.

The British objective is to attack the bridge and secure it before the Germans can destroy it.

To win the scenario, the British must have neutralised the engineers, driven back the defenders and have at least one section on the bridge itself.

In the patrol phase the Germans will use three patrol markers and the British will use four (because they are attacking). The British will also have two free patrol moves before the patrol phase properly commences.

The game will be play across the width of the table. The canal will be down the centre of the table, with the bridge placed in the central third of the table. The canal can only be crossed by using the bridge.

The British will start the patrol phase from either the left corner or the right. (roll 1d6 1-3 left, 4-6 right)


The Germans side of the table will be in three sections left, centre and right To see where the Germans will start the patrol phase roll 1d6 (1-2 left, 3-4 centre, 5-6 right)

So, this time the British force is somewhat stronger, having some armour appearing during the game. The Germans have also been slightly strengthened by the addition of the SdKfz 250/9.

In this game, Brian was the defending German leader, while I was commanding the British.

The table was laid out like this. Clearly the RAF has been doing some bombing and there are craters and gutted buildings near the canal. You can see how the Patrol Phase ended in these pictures.


Our Force Morale rolls favoured the Germans, who had a FM of 11, with the British being somewhat less motivated at FM 8. The Germans wasted no time in deploying a section right on the edge of the canal, protected by an earthwork.


Access to the bridge was made difficult by two sections of barbed wire. The engineers began to drive towards the bridge, protected by a tripod-mounted MG42 behind an earthwork in front of the walled farm.


The recce carrier section was the first British unit to appear. The idea was to dash forwards to seize the bridge.


I also deployed a rifle section in the ruins close to the bridge, placing them on Overwatch. I had a JOP placed just behind the ruins, which I hoped would let me get troops forward quickly.


I got another section on the table, moving them tactically in support of the carriers towards the bridge.


The Germans by the canal began to open fire on the section I had stationed in the ruined buildings, causing both shock and casualties. Over time, this would be a real problem for me.


The second section closed on the bridge, but was unable to cross because of the wire. The carrier teams dismounted, leaving the drivers in the vehicles. The rifle section on Overwatch fired at the engineer half-track, causing enough shock to make it withdraw.  Unhappily, this drew a lot of fire from the Germans in response, inflicting both shock and casualties.


The Germans were also deploying across the canal, with a section in the trees near the walled farm. My rifle section in the ruins was having big problems from accurate fire from two directions, with the MG42s causing many casualties, finally causing the few survivors to flee. This caused my FM to drop to 6. Luckily, by this point, a tank from the lead troop of the advancing squadron made an appearance. I hoped that this would turn the fight to my advantage. So far, the engineers hadn't managed to start working. I had also deployed my remaining rifle section, close to where the other one had fled, but out of sight of the Germans. The appearance of the tank led to the withdrawal of the German engineer section. 


To the right of the bridge, the tripod MG42 was hitting the recce section, with extra fire coming from a German section in the trees closer to the bridge. Luckily, my Senior Leader had also arrived with the platoon 2" mortar. Smoke time!


The smoke enabled the recce sections to get back on board their carriers and they drove forward over the wire obstacles (shown here by them being removed from the road). The Cromwell was also firing HE at the Germans, with a liberal dose of co-axial MG fire too. This was beginning to weaken the defenders, but I was worried about Panzerfausts and the even more nasty Panzerschreck. The armour of the carriers proved to be an impermeable barrier to the MG42, which was firing at the recce section now holding the bridge.


The SdKfz 250/9 now appeared. This was more of a problem, as its 2cm autocannon was capable of defeating the weak carrier armour. Luckily the Cromwell's commander was able to direct fire at the half-track and drive it off with shock and a wounded commander.


Another cross-canal firefight developed and my rifle section took up station in the ruined buildings. Combined with HE and MG fire from the Cromwell, this section was much more successful and the Germans were suffering losses now, with shock building up too.


Things were now looking pretty impossible for the defenders. The British had the recce carriers on the bridge, with a rifle section just behind and a Cromwell tank ready to blast anything that might appear from the walled farm, especially the half-track full of engineers, so the Germans pulled back, leaving the British in control of the bridge.

Well, this time the scenario delivered a British win, mainly because of the armour.

I am still not fully happy with the scenario. The tweaks I've made seem to have shifted the balance towards the attackers, but possibly too much so. I have thought about this again, and perhaps the answer might be to give the Germans a second tripod MG42 or maybe a second Panzerschreck? 

Alternately, perhaps the answer might be to leave the forces the same but play the game along the length of the table, with the canal closer to the German end, leaving the British with more ground to cover? In that scenario, the Germans could deploy in depth, forcing the British to fight along a longer approach to the bridge, with more opportunities to delay them until the engineers could place charges and blow the bridge. Currently, I like this idea better.